 Cropped
Help
Help / Crop, optimize & export
Video annotations, motion and saved styles
Video annotations work the same on Mac, Windows and Linux.
Open a video in Studio, and select a drawing tool from the annotation toolbar: Text, Rectangle, Circle, Arrow, Cross, Number, Draw, Focus, Hide or Blur, or add a picture or clip with Image or video. Annotation tracks stack above the Video track. The queue stays on the left and the Inspector stays on the right, showing the selected layer. Collapse Queue for more canvas space and use the slim left rail to reopen it. Crop ratios and Browser frame stay above the preview.
Place and edit a layer
- Move the playhead to where the annotation should appear, choose a tool and click or drag in the preview. Text starts inline editing; Number stays active so you can place consecutive badges. Press Escape to cancel a drawing.
- Drag the annotation in the preview to move it; use its corner handles to resize it.
- Double-click a text annotation to type directly on the preview. Press Enter for a new line, Command + Enter (Windows keyboard: Ctrl + Enter) to commit, or Escape to cancel.
- Select a layer to open its settings in the Layer tab. The tab is available before you create a layer, and the compact Layers button above the timeline opens it too. Use Style for text and appearance, Motion for animation, and Position for exact geometry and keyframes. The text field remains available there too; double-click editing on the canvas still works. Switch to Studio in the sidebar whenever you need export settings.
The right sidebar opens slim so the preview gets more room. Drag its left edge to make it wider or narrower; double-click that edge to reset it. Cropped remembers one width across Layer, Studio, Drop Zone, Capture and App. Switching Style, Motion and Position keeps the inspector and preview in place.
While paused, visible layers within their show/hide interval appear at full opacity and fully revealed. This makes a newly added fading label visible immediately. Playing the video restores its actual opacity, fades and draw-on reveal. Hidden layers and layers outside their time range stay hidden.
Text spacing and appearance
In Layer → Style → Spacing & corners, Line height → Auto · 1 / 1.3 uses:
- 1 for a single line.
- 1.3 when text wraps or contains line breaks.
Text height follows the content and padding. Line spacing adds space between lines; a single line does not gain extra trailing space. Choose Custom to set line spacing from 1 to 2. Existing custom values remain until you choose Auto.
Change Font size, Padding, Corner radius, text Color and Fill. Appearance offers Solid contrast or Glass. These controls keep the text editable. Check your result against both light and dark video content before exporting.
Choose a style and where it goes
Cropped is the starting style on a new installation, using purple #874efe for text and annotation marks over the dark text card. Existing layers and saved default choices are preserved.
The Style section in the Layer tab shows each style as a swatch: Cropped, Glass, Minimal and any styles you saved. Above the swatches, choose where a style goes:
- This layer restyles the selected layer as soon as you click a swatch.
- All layers restyles every layer in the video at once.
- New layers sets the starting style for annotations you add next. Existing layers are unchanged.
Restyling one layer or all layers is a single edit. Press ⌘ Command + Z to undo it and ⇧ Shift + ⌘ Command + Z to redo it. Layer text, show/hide times and manual position routes stay intact; text height can refit to the new typography, and recognized entrance keys follow the style's transition timing. With no layer selected, the Style section still lets you choose a style for all layers or new layers.
To save the current layer's look as a style:
- Select the layer and open Layer → Style.
- Open Save this look as a style, type a name and choose Save. If a saved style already has that name, the button reads Update.
- Optionally tick Remember starting position to reuse its resting position and size for new layers.
- Optionally tick Use for new layers to make it the starting style.
Styles save appearance, spacing, entrance/exit choices, transition duration and easing, plus the duration used when creating new layers. They do not save the layer's text or its animated position route. For a Pop animation, the saved position uses the full-size resting pose. To remove a saved style, hover its swatch and click its ×. Layers already using it keep their look. Built-in styles cannot be overwritten or removed.
Saved styles stay on this computer. They are separate from the editable video project and are not synchronized to another device.
Make a style from a brand
Cropped can make a style that matches a brand from a picture of it, such as a screenshot of its website or its logo.
- Select a layer and open Layer → Style.
- Open Make a style from a brand and choose Choose a picture….
- Check the swatch and the note, change the name if you like, and choose Save. Tick Use for new layers to start new annotations with it.
On its own, Cropped reads the picture's colors on your computer: the brand color becomes the card, with white or dark text, whichever reads better. To match corners, sizes and motion as well, add your own Claude API key under Preferences › AI tools › Provider connections and tick Use Claude to make annotation styles. Claude then looks at a small copy of the picture, sent from your computer straight to Anthropic and billed to your account. Your AI app can do the same from a picture or a web page link with create_annotation_style (see AI tools).
Timing and motion
On the timeline, drag a layer's bar to move its timing, drag either end to trim it, and drag diamonds to retime keyframes. Ordinary annotations follow their layer order. Source effects render first (Blur, then Focus), and Hide renders above other marks.
In Motion, choose Show / hide, Fade, Slide up, Slide in, Pop or Draw on. Draw on reveals the layer from left to right. Under Easing, pick a curve by its shape: Linear, Smooth, Power 1–4, Sine, Expo, Circ, Back, Bounce, Elastic or Steps. Then choose In, Out or In / out. Set Transition seconds for the entrance and exit. Cropped keeps a recognized preset entrance coordinated with these controls while preserving later manually positioned keys and their individual curves. A later keyframe can limit how long the entrance lasts.
To move a layer during the video, scrub to a new time and drag or resize it in the preview, or edit its Position values. This adds or updates a keyframe. To next key chooses how motion reaches the following key; Hold keeps the earlier pose until the next one. Previous key, Next key and Delete key help refine the route.
Layer times use finished-video seconds. Changing clip speed or trimming clips does not automatically retime annotation layers; check the timing after those edits.
Preview the animation
Choose Preview animation in the Layer inspector. The playhead moves to that layer's start, and normal video playback begins. It continues past the annotation until you pause or the video ends; it is not a looping layer-only preview.
Use playback to review fades, opacity and motion. The full-opacity paused editing view does not change the exported animation.
Source effects and annotation tools
Arrow uses the same filled arrowhead as screenshots; drag its endpoint handles to adjust it. Draw creates a freehand path. Number creates a numbered badge with Solid, Ring or Soft styling in its settings.
Blur pixelates the source beneath its animated rectangle. Focus dims the surrounding frame and adds a white outline around the clear area. Hide draws an opaque black rectangle above other annotations. These effects follow their show/hide times, positions and motion keys in the rendered video.
Hide and Blur start with immediate show/hide timing. If you apply a fade, lower their opacity or move their bounds, the picture can become visible during that transition. Check playback before sharing sensitive footage. Pixelation is a visual effect; use a fully opaque Hide layer when the pixels must be covered.
Pictures and videos as layers
Choose Image or video (Media in the Layer tab) and pick a PNG, JPEG, WebP or GIF picture, or an MP4, MOV or WebM video, from your computer. It lands in the top-right corner at its own shape, like picture in picture, starting at the playhead. A video layer stays up for the length of the clip.
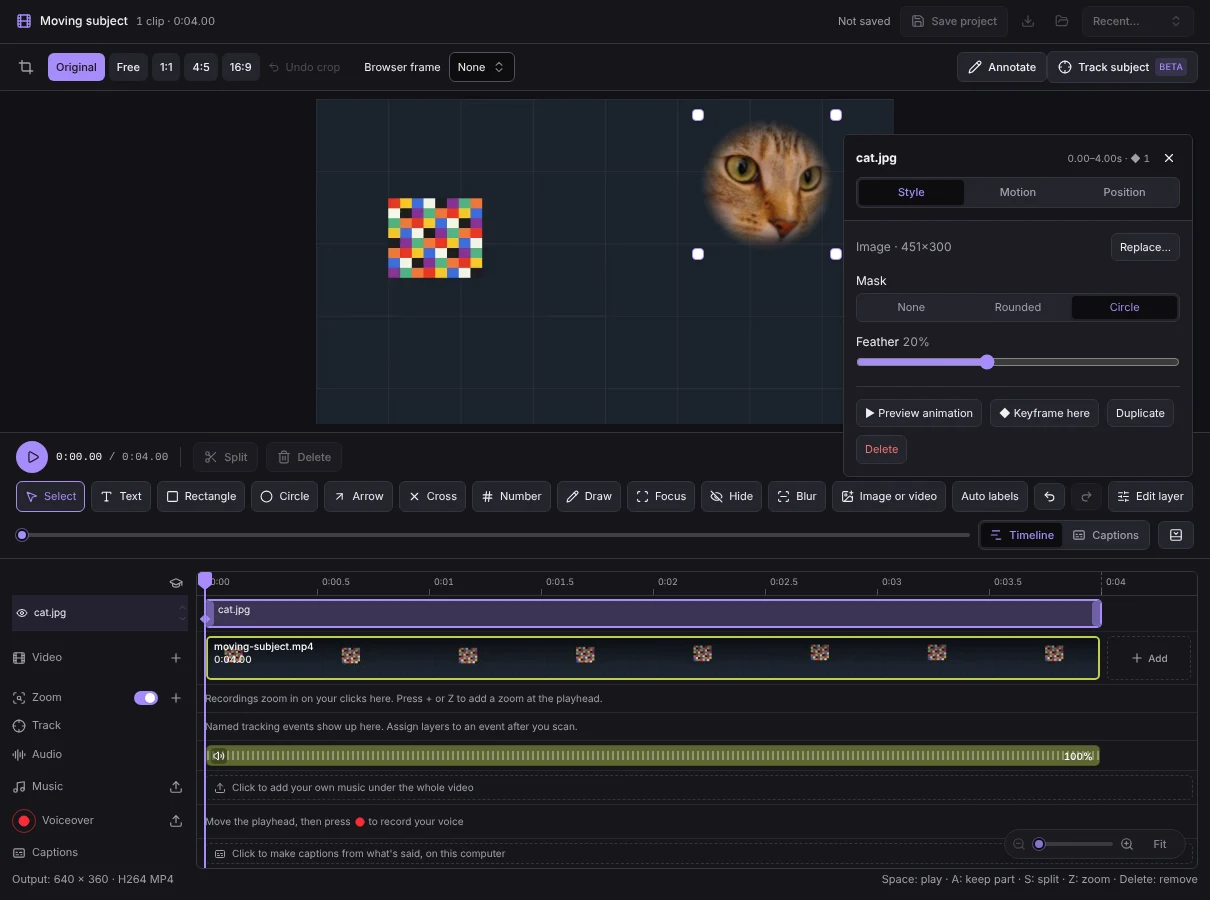
- Mask cuts the layer out: None, Rounded corners or Circle. Choosing Circle makes the layer square so it stays round.
- Feather softens the edge, up to half of the layer's shorter side.
- Replace… swaps in another file and keeps the layer's place, timing, motion and any subject it follows.
- For a video, Start video at skips the start of the clip, and Loop plays the whole clip again when it ends. Video layers play without sound.
The picture fills the layer box and crops what doesn't fit, so resizing the box changes the framing. Move, resize, animate and time the layer like any other. It can also follow a tracked subject (see Subject tracking).
The layer uses the file where it is on your computer. Keep it there until you have exported, or use Replace… to point at its new place.
Save, reopen and export
The project name, save state and file buttons share the header row above the preview:
- Save project or ⌘ Command + S saves the latest edits immediately. Edits also autosave after a short pause; wait for Saved · rN before closing.
- Every save also writes a
.croppedfile named after the project, in Documents › Cropped Projects. Later saves update that same file. A project you opened from a light.croppedfile keeps updating that file instead. - Recent projects (shown once you have saved a project) reopens the full editable timeline, including annotations, crop, browser frame, captions, zooms, audio and export settings.
- The download button (Download .cropped) saves one
.croppedfile straight into your Downloads folder, with no window to fill in. It holds the project and every picture, video, music and voiceover file it uses, so you can send it to someone else (or another computer) and it opens with nothing missing. A note under the header names the file and its size, and offers Show in Finder (Show in Explorer on Windows, Show in Files on Linux). If a file with that name is already there, Cropped adds a number instead of replacing it. A downloaded file is a finished copy: later edits keep saving to your project, not to the download, so download again to share the newest version. One downloaded file can hold up to 4 GB of media. - The folder button (Open .cropped) imports a working file as a separate editable project. When the file has media inside, Cropped unpacks it into its own folder in Documents › Cropped Projects (named after the project, ending in media) and opens it from there. Older
.cropped-video.jsonworking files are also supported.

With nothing open, Resume editing lists your work. Type in the search field to filter by name. Projects shows saved and recoverable projects with their length, clips, layers and when you last edited them. .cropped shows working files you saved or opened, plus other .cropped files Spotlight finds on this Mac (on Windows and Linux, ones in your Documents, Downloads and Desktop folders). Clicking a file you saved from a project reopens that project; any other file opens as a new project, once. Open .cropped… picks a file from anywhere.
The .cropped files Cropped keeps up to date as you save are light: they hold edit decisions and references to the original videos, images, music and voiceover files, not the media itself. Use Download .cropped when you want one file with everything inside. Sources saved inside the working file's folder use relative references: move that folder and its media together. Other references keep their existing paths. Cropped reports missing media before opening a project; restore the original files to reopen it.
Autosave updates Cropped's local project library and the project's .cropped file together.
To open a .cropped file, any of these work:
- Drag it onto the Cropped window.
- On a Mac, double-click it in Finder, drag it onto Cropped in the Dock, or use Open With › Cropped.
- Use Open .cropped or Resume editing inside the app.
On Windows and Linux, double-clicking a .cropped file doesn't open Cropped yet: drag it onto the window or use Open .cropped.
If another editor has saved a newer revision, Cropped keeps your edits and shows Needs attention. Choose Save separate copy to retain them without overwriting the other version. After an interrupted session, use the recovery prompt to resume pending local edits.
Choose output settings in the right-hand Preferences panel, then Optimize & Save to create a separate video. An exported MP4 contains the rendered annotations. Reopening that MP4 does not restore editable layers; reopen the saved project for those.
See Edit videos for trimming, crop and export, and The Studio for queue and Preferences controls.
Still stuck? Click the ? button at the bottom left of the Cropped Studio to ask, send us a message, or request a feature.