 Cropped
Help
Help / Drop Zone
The Drop Zone
The Drop Zone is a small panel that floats above your other apps. Drop files on it and Cropped optimizes and saves them in one step, with no settings to pick. It's also where your screenshots and recordings land, and where you can arrange two or more images into one. Older versions of Cropped call it the Drop window.
A quick tour
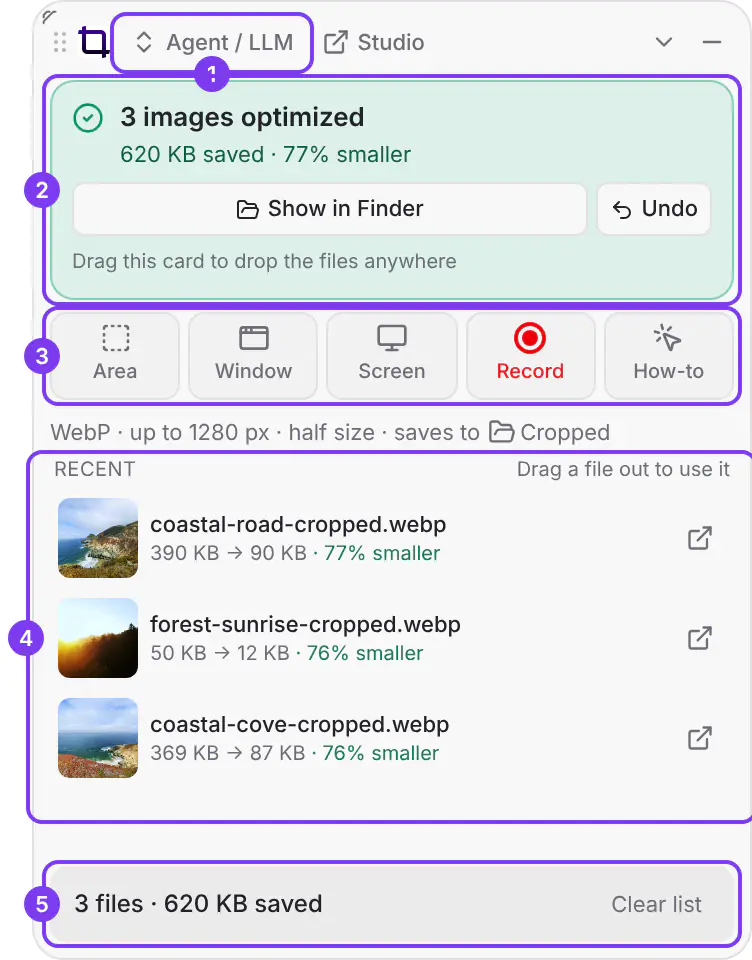
- The preset picker shows the preset the next drop uses, such as Agent / LLM. Click it to pick another one. See Pick a preset for the next drop.
- The green card shows what the last drop saved. Show in Finder opens the folder, Undo moves the files to the Trash, and on a Mac you can drag the card itself to drop every file somewhere else. Before your first drop, this is where you drop files.
- The capture buttons take a screenshot of an Area, a Window or the whole Screen, Repeat the last area, Record the screen or record a How-to. See Capture from the Drop Zone.
- Recent lists your last 24 results with how much each one saved. Drag any of them into an app, or select several to drag or arrange them together.
- The running total adds up the files in Recent and what they saved, such as "3 files · 620 KB saved". Clear list empties Recent; the saved files stay in their folder.
Optimize files by dropping them
- Drag images, videos or whole folders onto the Drop Zone.
- Cropped optimizes them one at a time and shows progress, such as "Optimizing 2 of 5".
- A green card shows what you saved, such as "1.05 MB saved · 94% smaller".
You can also paste an image with ⌘ Command + V (Windows and Linux: Ctrl + V) while the Drop Zone is active.
Results are saved to Downloads/Cropped and your originals are never touched. The default preset, Agent / LLM, makes WebP images up to 1280 px wide and then halves them, so screenshots stay sharp enough to read but small enough to paste into AI chats. Pick Web in the preset picker for full-size images.
Drop one picture
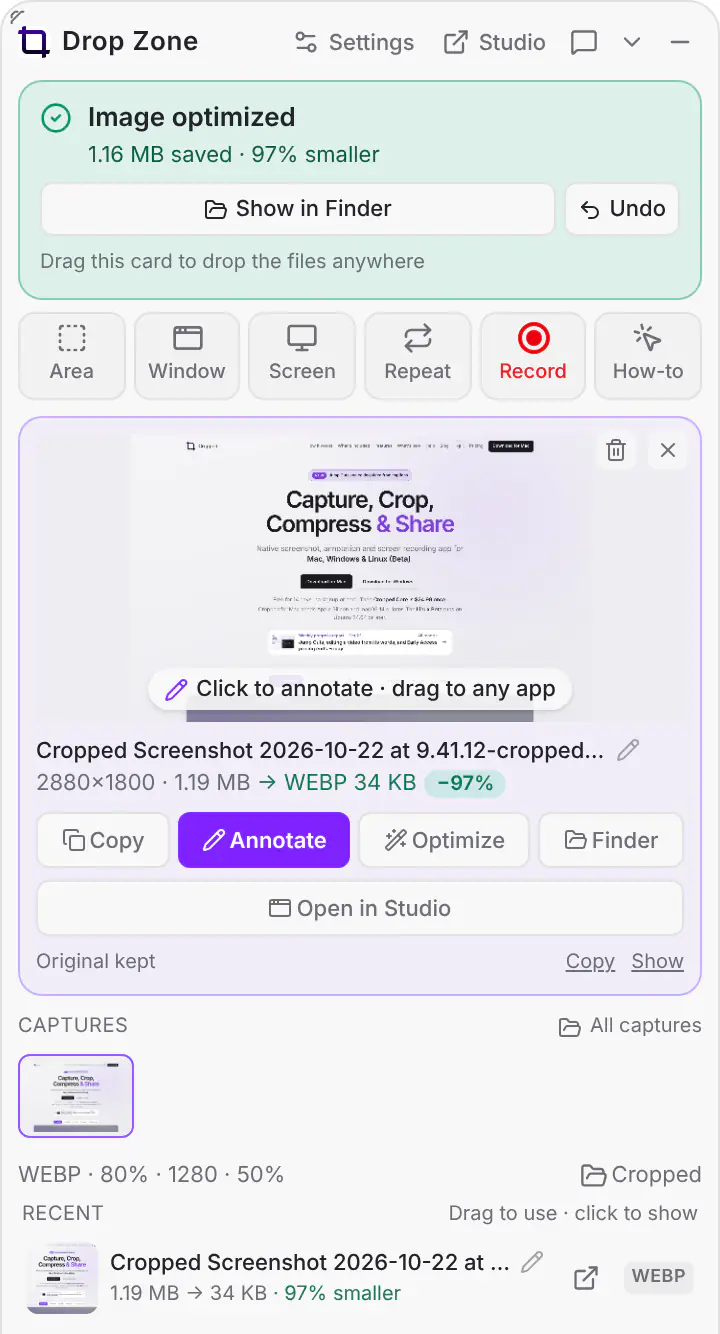
Drop or paste a single picture and it lands on the Drop Zone's capture card, the same card a screenshot uses, with Copy, Annotate, Optimize and Finder (Windows: Explorer) under it. Nothing is saved until you click Optimize. Click the picture to annotate it.
A single video opens with a trim bar instead, so you can trim it before you optimize it or open it in the Studio.
Shrink a PDF
Drop a PDF on the Studio window, or drag it straight onto the Drop Zone for a quick optimize, and Cropped shrinks the pictures inside it. PDFs full of photos and scans shrink the most: one 185 MB PDF came down to 5.7 MB. Each picture is brought down to the size it is actually shown at on the page, then recompressed. The rest of the file is tidied without changing how it looks: pages saved with no compression (CorelDRAW does this) are compressed, a picture or font stored more than once is kept once, and leftovers from earlier saves are dropped. Text, fonts, links, forms and bookmarks stay exactly as they are, and pictures that are already small are left alone.
The smaller copy is saved next to your other results, named like your images (for example report-cropped.pdf), and the green card shows how much you saved. Your original PDF is never touched. If nothing inside could get smaller, Cropped says so, tells you what most of the file is (for example text and drawings that are already compressed), and doesn't save a copy.
In the Drop Zone, the smaller PDF shows in Recent like any other result, with how much it saved. On a Mac, click Original under it to see the PDF it came from in Finder. Windows and Linux don't tell Cropped where a dropped file came from, so the link isn't shown there.
Choose how small PDFs get under PDF size. It's in two places, and both change the same setting: Preferences › Images › PDFs and Preferences › Drop Zone › PDFs. In the Studio, PDF settings on the bar that shows the result takes you straight there.
The PDF size menu explains each choice: every row says what it's good for and, on the right, the resolution photos are brought down to. Under the menu, a line says what the current choice does, such as "Photos at 110 dpi. About half the size of Screen. Good for email."
- Print: sharp when printed (300 dpi).
- Screen (default): sharp on any screen and much smaller. Best for sharing and email. Screenshots and diagrams keep a little more detail, so small text stays crisp.
- Smaller: about half the size of Screen. Fine for reading on a laptop or phone.
- Smallest: as small as it goes while text stays readable. Pictures look soft.
- Under a size…: type a limit, like 10 MB, or tap 2, 5, 10, 20 or 25. Cropped makes the PDF only as small as it needs to be to fit, so a file that's already under the limit keeps its quality. If even the strongest step can't fit, you get the smallest copy and a note saying how big it is. Cropped tries Screen first. If that's too big, it works out which stronger step should fit and makes that, so a big file usually takes two passes, and the bar shows which step it's trying.
- Keep size, recompress only: keeps every picture's pixels and only recompresses them.
Good to know:
- PDFs full of photos or scans shrink the most. A PDF that is mostly text barely changes, unless the app that made it skipped compression: a 21.9 MB menu from CorelDRAW came down to 7.8 MB at every level, looking exactly the same.
- A digitally signed PDF loses its signature in the smaller copy, and Cropped warns you. Keep the original where the signature matters.
- Locked PDFs, ones that need a password to open or that block changes, can't be shrunk. Save an unlocked copy, then drop that.
- Print colors (CMYK), JPEG 2000 and black-and-white fax-style scans are left as they are.
- One PDF at a time is part of Core. Dropping several PDFs at once comes with the Pro add-on; on Core, the first one is optimized and you can drop the others one at a time.
- A watched folder shrinks new PDFs too.
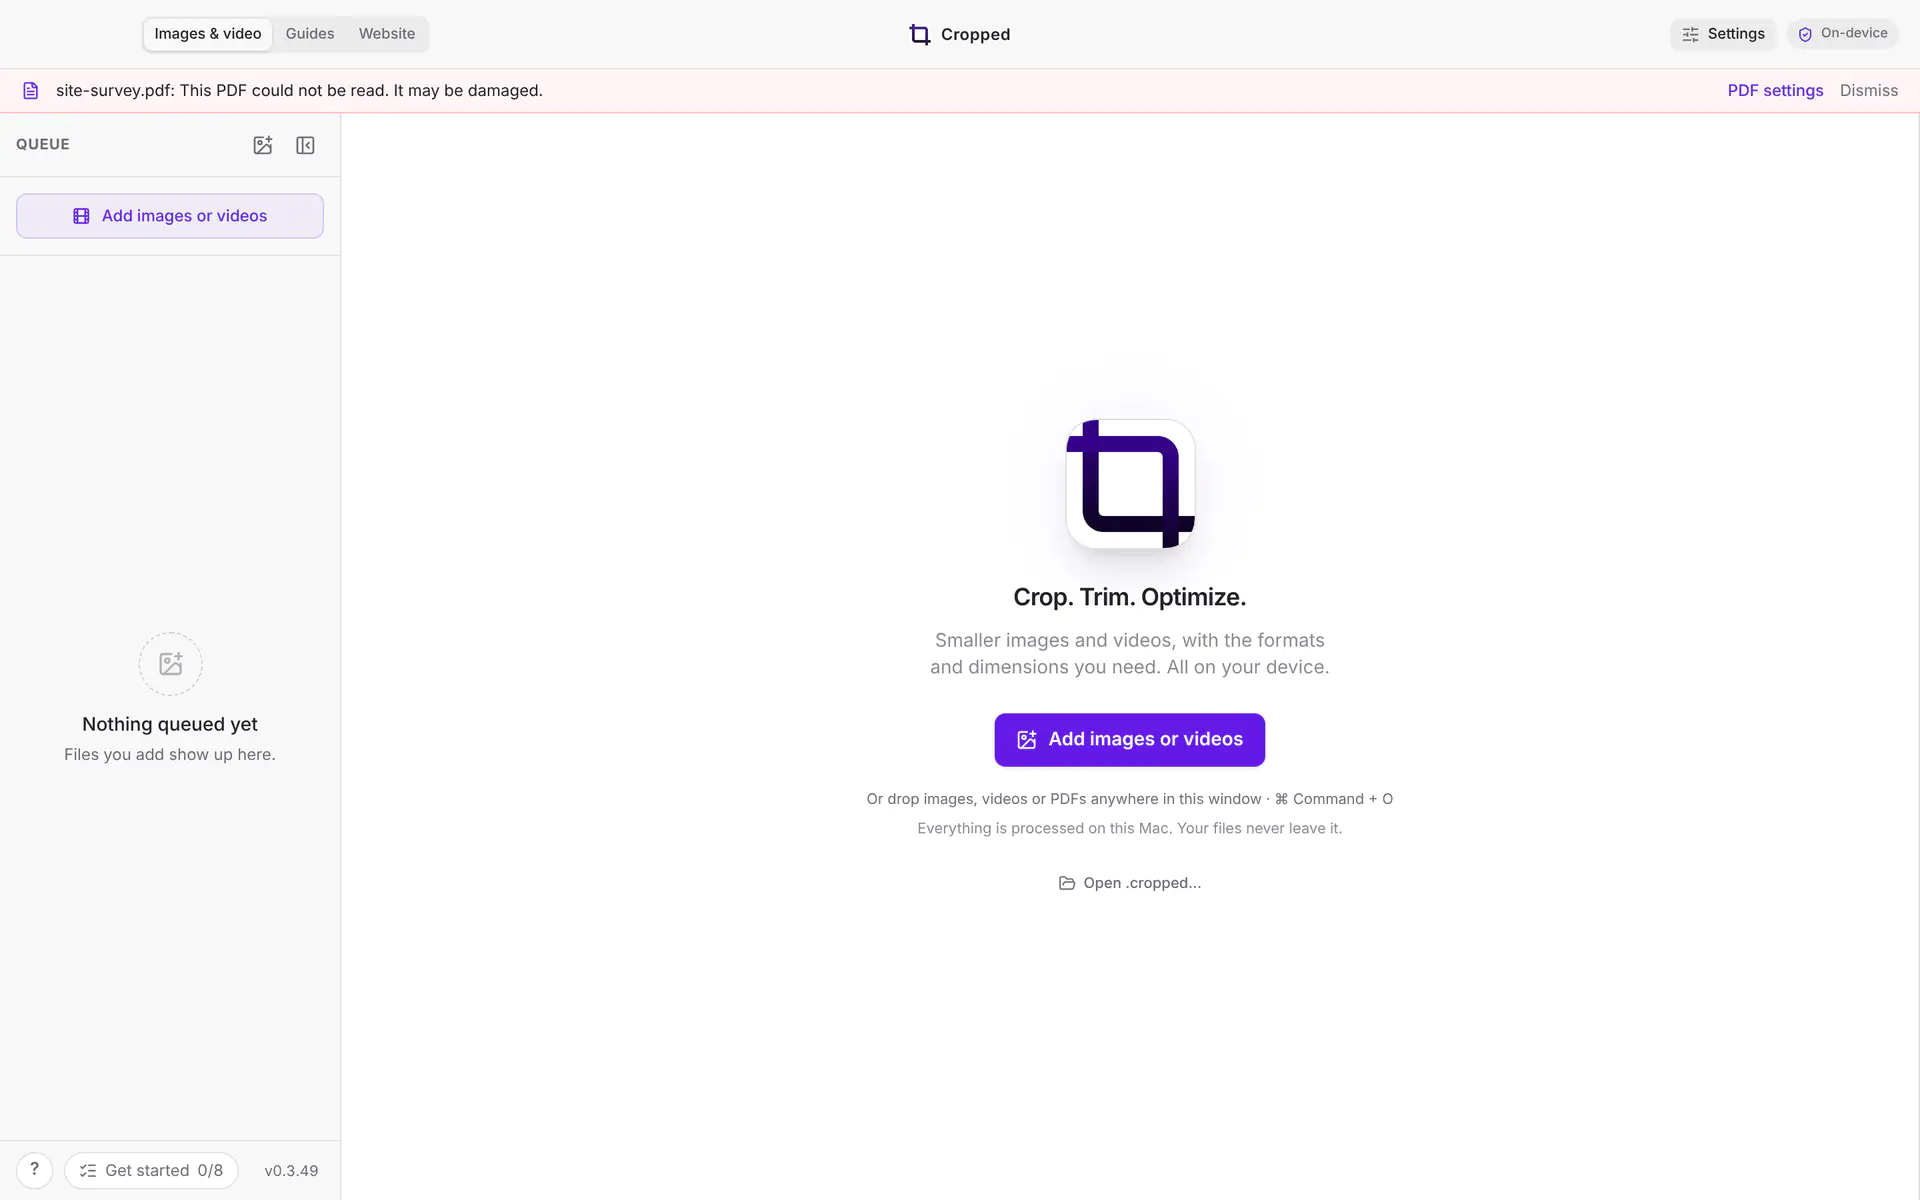
- A PDF dropped on the Studio isn't added to the queue. A bar at the top shows its progress, then the saved size, with Show in Finder (Explorer on Windows, Files on Linux) and PDF settings. The copy goes to the Studio's save folder.
- Still too big? The same bar offers the next step down, such as Try Smaller. It saves another copy at that step without changing your PDF size setting.
Use the results
- Point at a capture or a result and drag it. The pointer turns into a grab hand as soon as you're over the Drop Zone, even while another app is in front, so there's no need to click into the Drop Zone first. On a Mac, the app you were in keeps the keyboard, so you can type straight after dropping.
- Drag the green card into any app or folder to move all the saved files there (Mac). On Windows and Linux, drag files one at a time from Recent.
- As soon as you start dragging, the Drop Zone fades and shrinks to its bar, so it's out of the way of wherever you drop.
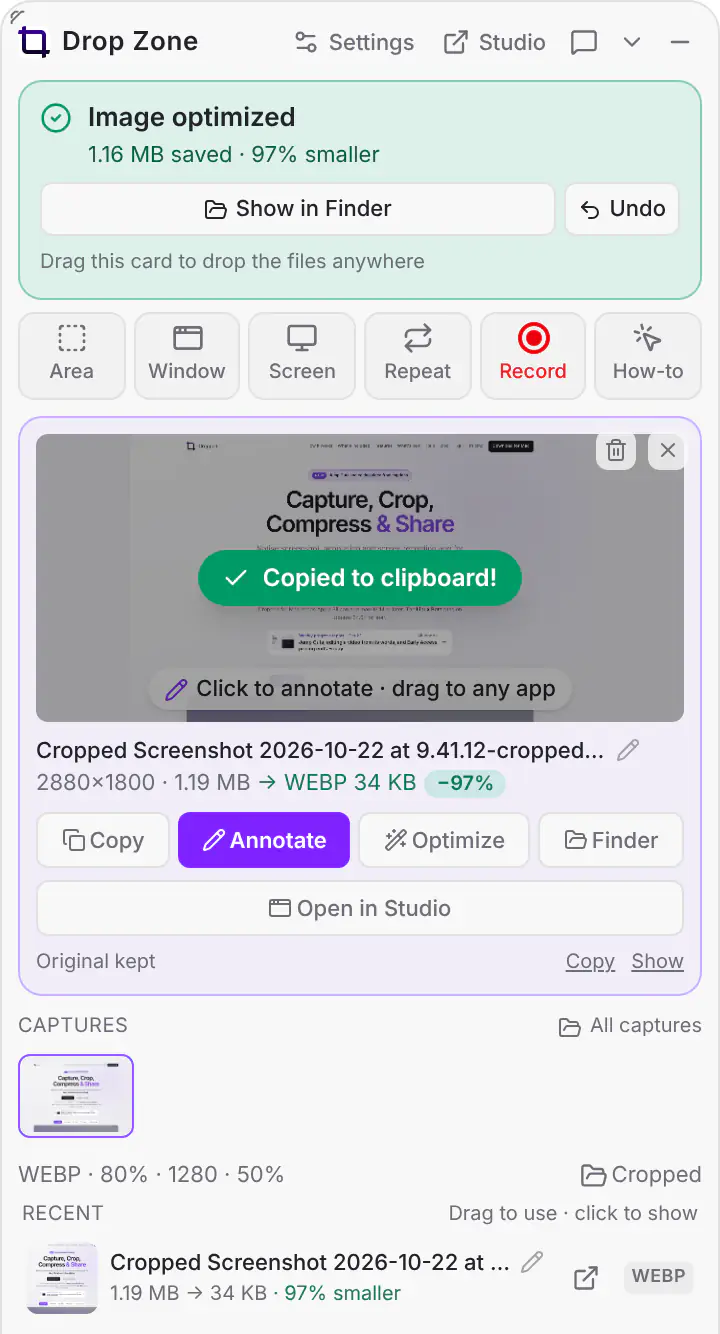
- Copy result to clipboard, when it's on, also copies the last image so you can paste it with ⌘ Command + V (Windows and Linux: Ctrl + V). Copied to clipboard! flashes over a capture each time Cropped copies it.
- Open in Studio: on a capture card, choose Open in Studio. In Recent, click the arrow-out-of-a-window button beside any image or video. It opens in the Studio for cropping, captions, browser frames and the rest.
- Share link (Pro): in Recent, click the chain-link button beside any picture or video to make a cropped.pro link anyone can open and comment on. A single dropped video has Share link right on its card. To get a link for every drop, turn on Copy a share link in the preset menu. See Share a dropped file.
Select several results
Click a picture to select it; no key needed. In Recent, the whole thumbnail is the select button. In the Captures strip, most of the thumbnail selects, and the Open band along its bottom opens the capture's card. Point at a picture and a big circle shows where to click; it fills with a check once selected.
Once something is selected, a plain click on any other item in that list adds it too, or takes it out again, so picking several takes no keys at all. Keys still work:
- ⇧ Shift + click selects everything between your last click and this one, on the picture or anywhere on the row. Right after a capture or a drop, with nothing picked yet, it starts from the first picture: ⇧ Shift + click the third one and the top three are selected.
- ⌘ Command + click (Windows and Linux: Ctrl + click) adds one more, or takes it out again.
- ⌘ Command + A (Windows and Linux: Ctrl + A) selects the whole list. Esc clears the selection, and so does shrinking the Drop Zone to its bar.
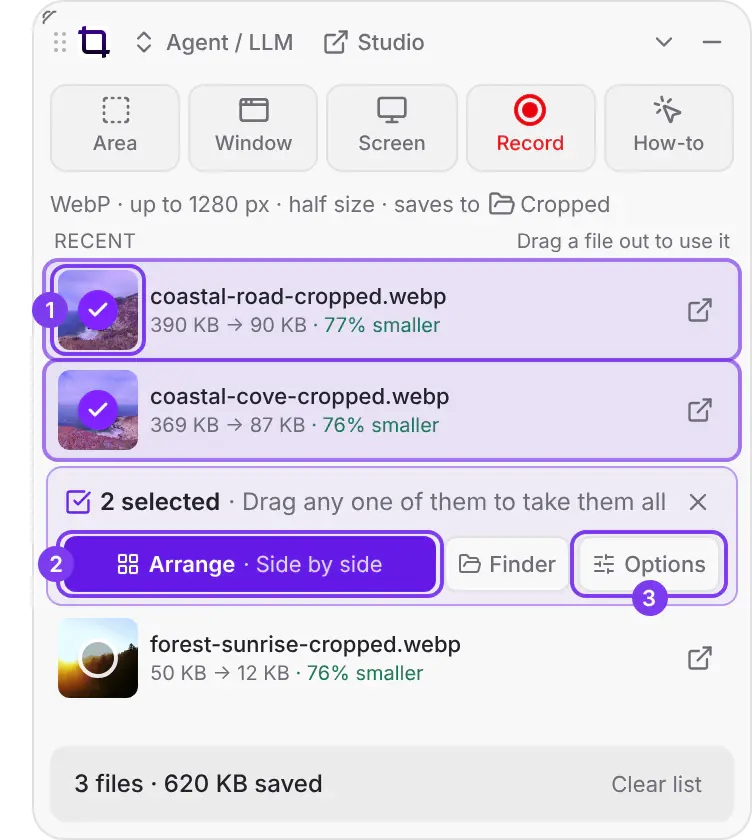
- Selected items get a violet ring and a check.
- The bar under them says how many you picked, with Arrange, which also says what it will make, such as "Side by side".
- Options opens the layout, padding and background for Arrange. Finder (Windows: Explorer) shows the files, and the × clears the selection.
On a Mac, dragging any selected item takes every selected file along in one stack. On Windows and Linux, drags still move one file at a time; selecting, Arrange and Show in Explorer work the same.
The selection lives in one list at a time, either the Captures strip or Recent, since an optimized screenshot appears in both. Clicking in the other list starts a new selection there.
Arrange several images into one
Arrange puts two or more images on one clean picture, evenly spaced, so you can send a before and after, two phone screens or a set of steps as a single file. Videos in the selection are left out.
- Drop the images on the Drop Zone, or take the screenshots, so they're in Recent or the Captures strip.
- Click the circle on each one you want. Two is enough.
- Click Arrange. Before you click, the button shows what you'll get, such as "Side by side"; hover it to see the size, such as "Side by side · 2412×2580".
- The green card says "2 images arranged" and the new image is at the top of Recent, ready to drag into any app. Undo removes it.
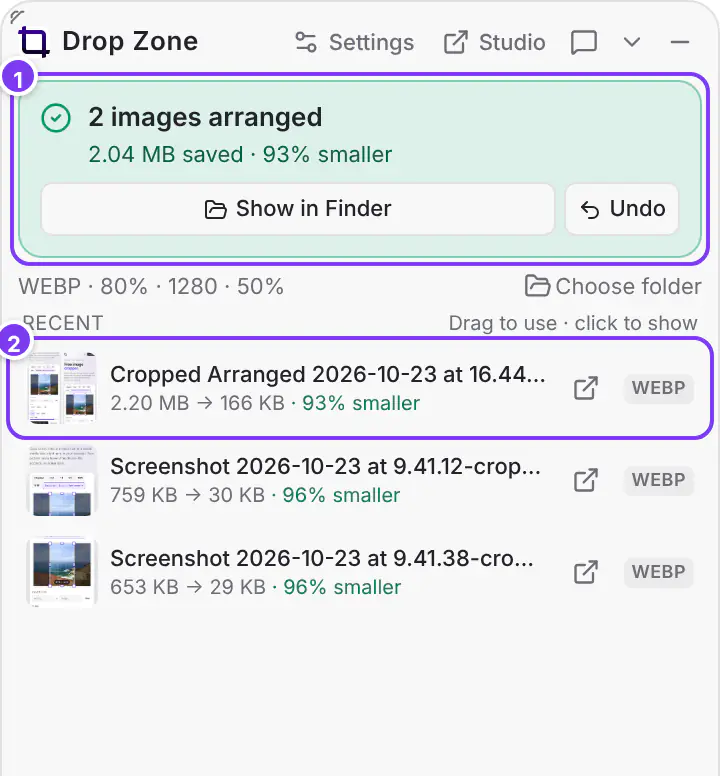
This is the image those two phone screenshots made, with the default canvas, 24 px of padding and the Agent / LLM preset:
Arrange options
Click Options in the selection bar to change how Arrange lays things out. A small preview of the images you selected shows the layout, padding and background as you change them, so you can see the result before you click Arrange. Your choices are remembered for next time, and Preferences has the same options.
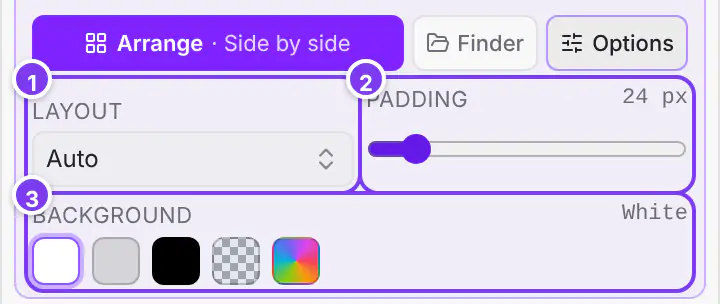
- Layout: Auto picks from the images' shapes, so two phone screenshots sit side by side, two desktop screenshots stack, and four make a 2×2 grid. Or choose Row, Column or Grid yourself. With two images, Grid is the same as Row.
- Padding: the space around and between the images, 0 to 200 px. The default is 24.
- Background: white (the default), light gray, black or transparent, or click the color wheel to pick any color. The name or color code of your pick shows beside Background. Light gray keeps the gaps visible between light screenshots, and the color barely changes the file size. Images with see-through areas show the background color behind them unless you pick transparent. Transparent stays transparent in WebP, AVIF and PNG; JPEG fills it with white.
Images keep their own size; nothing is enlarged. Results from Recent are arranged from the files you dropped (with the same crop), not from the already compressed copies, so the arranged image is compressed only once. The Drop Zone's format and quality apply to it, but not the preset's maximum width, scale or crop, so two screenshots side by side stay twice as wide as one. A very large arrangement is shrunk evenly to fit, and the button says "shrunk to fit".
Arrange every drop
To have every drop of two or more images come out as one arranged, compressed image, open Preferences › Drop Zone and pick Arrange into one under Several images. The layout, padding and background show up under it, so you can set them in the same place. Pick One file each to go back to one file per image.
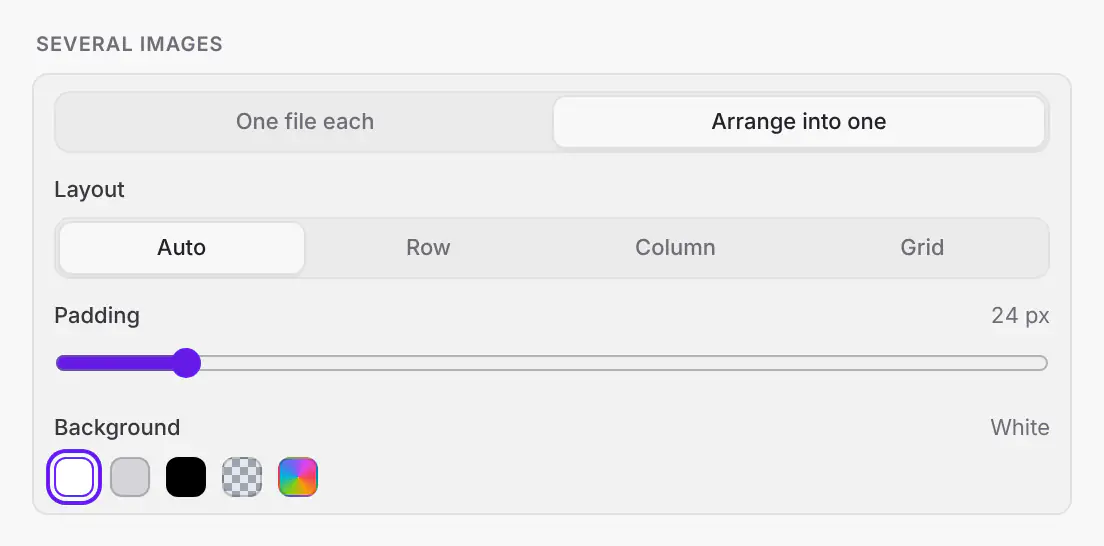
- Several images: One file each (the default) or Arrange into one.
- Layout: Auto, Row, Column or Grid, as in Arrange options.
- Padding: the space around and between the images.
- Background: white, light gray, black, transparent or any color.
Then drop the images. The green card says how many were arranged and how much smaller the one file is than the images you dropped. Here, three photos (7.2 MB together) became one 681 KB WebP with the Agent / LLM preset:
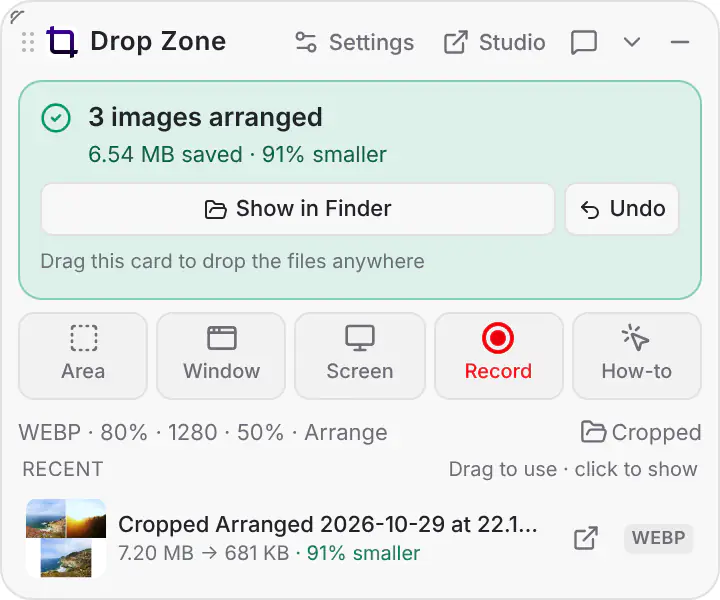
The arranged image is compressed once with your Drop Zone format and quality. Max file size applies to it too, so with 1 MB picked in Preferences the one image stays under 1 MB. Each image keeps its own size, as with Arrange. Videos and PDFs in the same drop are optimized on their own, and a drop with only one image is optimized as usual. The line under the drop area ends with Arrange while it's on.
To arrange just one drop without changing the setting, hold ⌥ Option (Windows and Linux: Alt) while you drop.
The same choice is in Preferences › Drop Zone › Several images, and changing it in either place changes both.
Why is Arrange grayed out?
Arrange needs at least two images in the selection. Videos don't count, so one image and one video can't be arranged. One GIF or video selected on its own can have its frames arranged instead: see GIF ➞ Arranged. If you selected a capture and a Recent result, only one list is selected at a time: select both images in the same list.
GIF ➞ Arranged: every frame in one image
Some AI chat apps look at only the first frame of a GIF, so the rest of it never reaches the AI. Arrange frames lays a GIF's or video's frames out in order, left to right and top to bottom, in one picture that any app can read.
- In the Drop Zone, select one GIF or recording: click the circle on it, or Command-click it (Windows and Linux: Ctrl-click).
- Click Arrange frames in the selection bar.
Cropped uses every frame of a short GIF. A longer GIF or video gets 36 frames picked evenly from the first to the last, so the green card says, for example, "36 of 120 frames arranged". The layout, padding and background come from Arrange options, and the image is compressed once with your Drop Zone format, like Arrange. It works on Mac, Windows and Linux.
To make a GIF that suits AI tools in the first place, see Recordings for AI.
Undo a drop
Click Undo, or press ⌘ Command + Z (Windows and Linux: Ctrl + Z) in the Drop Zone. The files from the last drop move to the Trash (Windows: Recycle Bin), so you can still get them back.
Rename files in place
Click the pencil next to a file name, type a new name and press Return. Esc cancels. The extension stays the same. If the name is taken, Cropped adds -2.
On a new screenshot, you can rename it before its optimized copy is saved, and the name is used when the file is written.
Capture from the Drop Zone
The row of buttons under the drop area takes screenshots and recordings: Area, Window, Screen, Repeat (the last area again), Record and How-to, which turns a recording into step-by-step instructions. Your newest capture appears on a card below them. See Screenshots, Screen recording and Record a how-to.
Open screenshots in Annotate
In Preferences › Drop Zone (or Preferences › Capture), turn on Open in Annotate. New area, window and full-screen screenshots open in the Annotate window before they're optimized. Save the annotation to make and optimize an edited copy; the original stays in history. The two stay in sync.
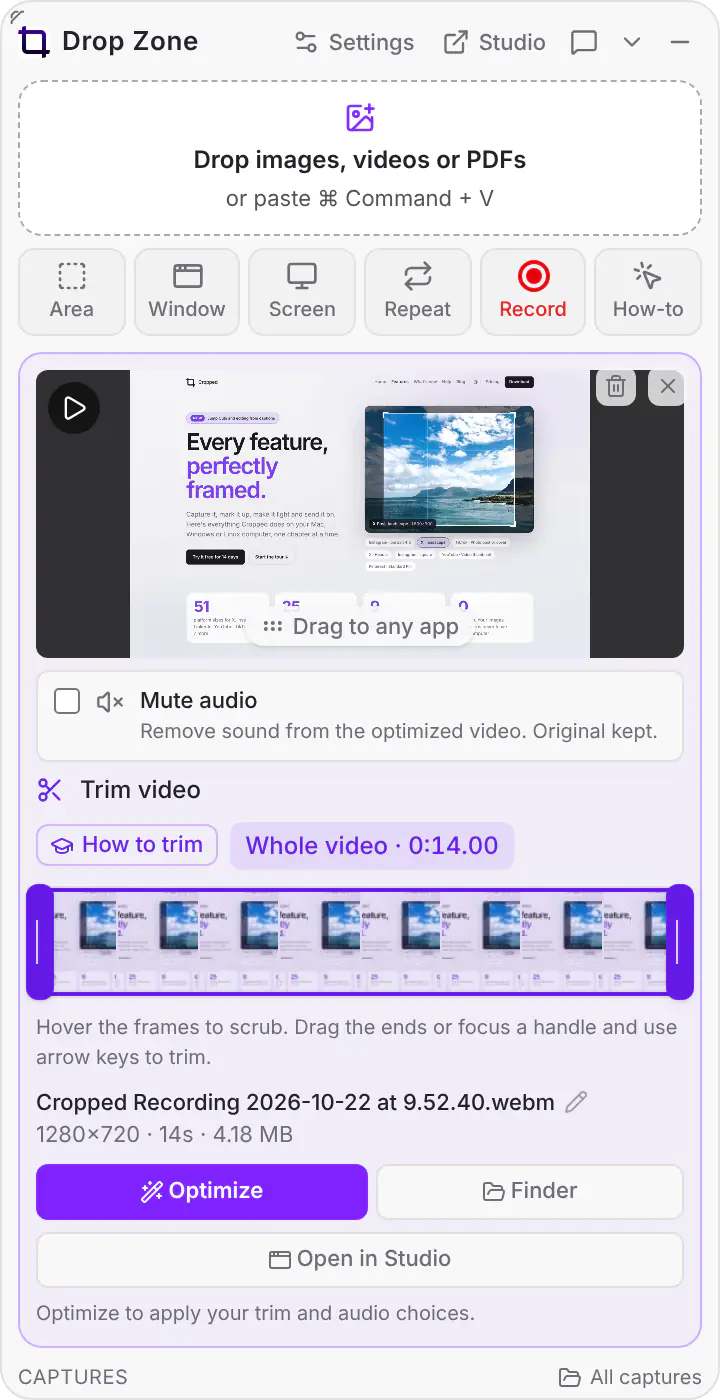
Quick trim for recordings
A new recording waits on its card with a trim bar. Hover the frames on the bar to scrub through the recording, click to jump there, drag the ends to cut the start and end, then click Trim & optimize. Turn on Mute audio on the card first for a silent copy; the original keeps its sound. See Trim and optimize.
Show, hide and move it
- The Drop Zone opens with Cropped and stays on top of other windows, on every desktop Space. On Windows it sits just above the taskbar.
- When you're not using it, it shrinks to a small bar that shows the current preset. Click anywhere outside it and it shrinks right away. Hover or drop on it to expand it again; on Windows and Linux, click the up arrow on the bar. The sliders button on the bar opens it too. The first time, the preset picker opens with it, so you can see where to change the preset.
- Drag the dots on its left edge to move it anywhere on your screen. They stay faint until you point at the bar, so the bar reads cleanly. When it is expanded, drag the dots beside its name, or anywhere in its header. To resize the expanded Drop Zone, drag its top edge, its left edge or its top left corner. It keeps its bottom right corner in place.
- The chevron shrinks it to the bar, and the minus button hides it. Studio in its header opens the Studio.
- To bring it back, choose Window › Show or Hide Drop Zone, press ⇧ Shift + ⌘ Command + D in the Studio or the Drop Zone (Windows and Linux: Ctrl + Shift + D), or click Show or hide Drop Zone in Preferences. On Windows and Linux, the menu button at the top left of the Studio has Window › Show or hide Drop Zone too.

Pick a preset for the next drop
Click the preset's name at the top of the Drop Zone, next to the logo. The menu lists your image presets with what each one makes, such as "WebP · 1280 px · half size", and a check beside the one in use. Click another to use it for the next drop.
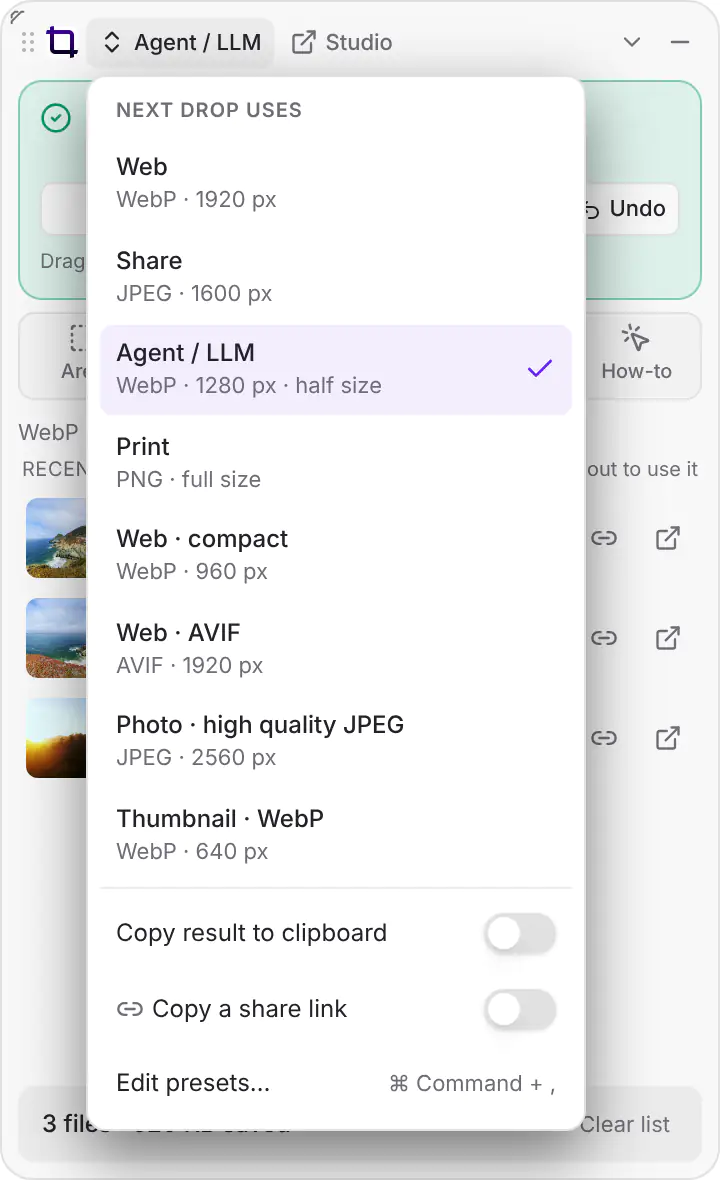
- Copy result to clipboard also copies each result, so you can paste it straight away. Batches copy the last image.
- Copy a share link (Pro) optimizes each picture and video you drop, then copies its cropped.pro link. Several files give one link per line. See Share a dropped file.
- Edit presets… opens Preferences › Drop Zone, where every other setting lives. The shortcut is ⌘ Command + , (Windows and Linux: Ctrl + ,).
The line under the drop area says what the next drop makes in plain words, such as "WebP · up to 1280 px · half size · saves to Cropped". It adds the crop shape, such as "1:1 crop", when one is set, and "· Arrange" while Arrange into one is picked. Click the folder at the end to save somewhere else.
Drop Zone settings
Preferences › Drop Zone in the Studio has everything else: image preset, format, quality, max width, max height, max file size, Scale (100%, 75%, 50%, 33% or 25%, applied after cropping), Crop, Copy result to clipboard, Open in Annotate, Several images, the video preset, PDF size and file naming. The output folder is set from the folder at the end of the line under the drop area. Editing a file in the Studio never changes these.
Video settings for dropped videos
Preferences › Drop Zone › Videos has every video setting the Studio has: Starting preset, Format and Video codec, File size (Quality, Bitrate or Max size), Maximum size, Frame rate, Audio and Advanced. Change anything and the Drop Zone uses your custom settings straight away. The preset menu shows "Changed from Web" with a Revert to Web link, so you can always go back.
To keep a mix for later, click Save settings as a new preset. It appears under My presets in the Drop Zone and the Studio. For what each setting does, see Video formats, presets and GIFs.
Screen recordings use these settings too when Preferences › Capture optimizes recordings with the Drop Zone preset.
Watch a folder
Turn on Watch folder (auto-optimize) in Preferences › General and choose a folder. Every new image, video or PDF that lands there is optimized with your Drop Zone settings, as if you'd dropped it. It's useful for a camera import folder or a screenshots folder.
Report a problem
When something fails, Report a bug or request a feature appears in the Drop Zone. It opens Preferences › Bug report in the Studio. You see the exact text before it's sent, and only your message, the app version and your system type are included. Your reports shows when we've received it and when it's resolved. You can also request a feature on the website and see what others asked for.
Still stuck? Click the ? button at the bottom left of the Cropped Studio to ask, send us a message, or request a feature.