 Cropped
Help
Help / Crop, optimize & export
Trim, crop and pick clips from videos
Open a video in the Studio to cut it down, crop it, and export a small copy. Cropped never changes the original.
Quick answer: to trim a video, open it in the Studio, drag the ends of the clip on the timeline to where it should start and stop, and click Optimize & Save. To cut out the middle, hover the timeline and click + to keep a part, then hover a dimmed part and click + again for the next one. Cropped joins the parts you keep when you export.
The export runs in the background, so you can keep editing while it works. It saves the video as it was when you clicked; if you change it afterward, click Export again for the new version (see Keep working while it exports).
Video imports normally reference the original file. Choose Make temporary copy in Preferences › General › Video imports if you need to disconnect or move the source after import. See original files and temporary copies and recommended hardware.
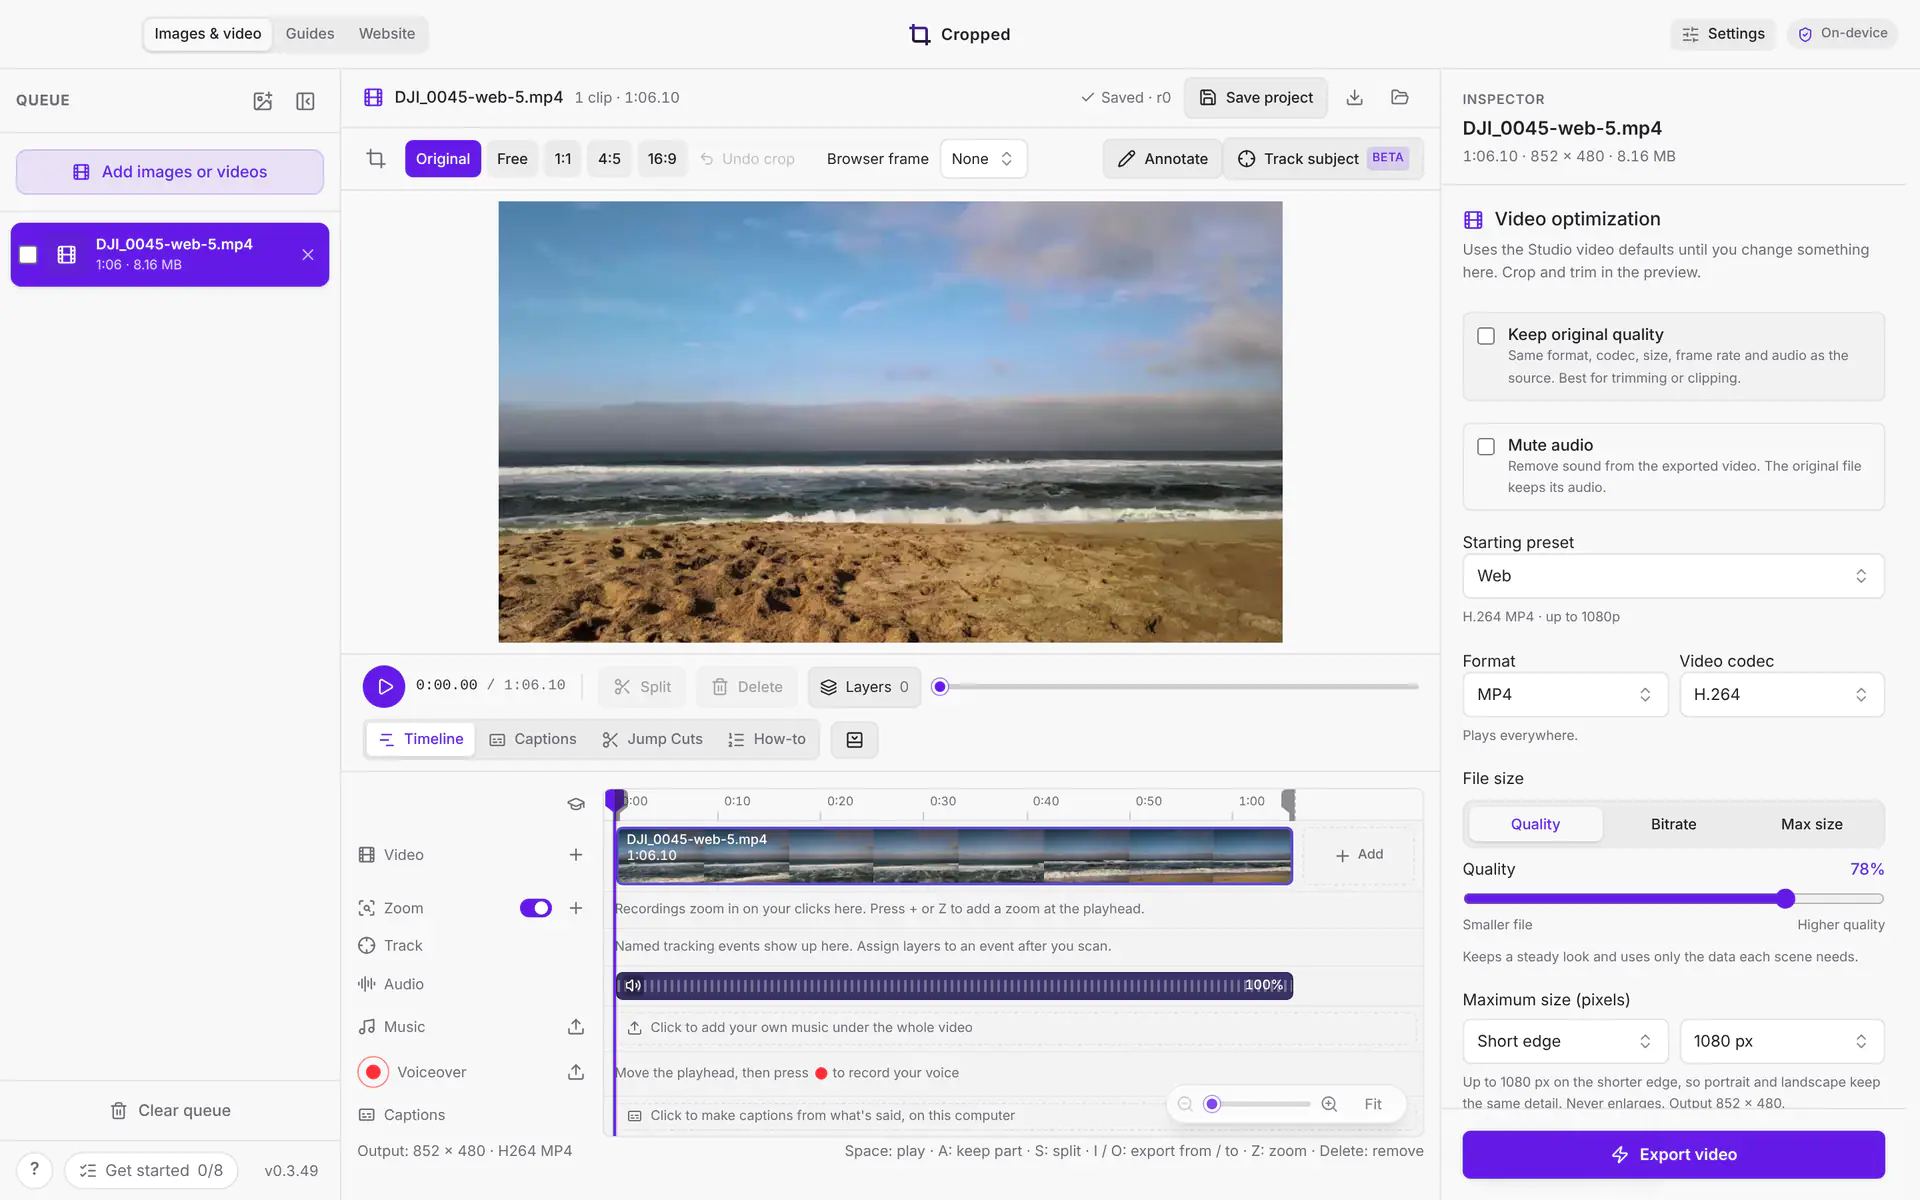
Annotations on the timeline
Annotation tracks sit above Video in the main timeline. Add text, shapes, Focus, Hide and Blur from the tool grid at the top of the Layer tab, drag their timing bars and keyframe diamonds, and double-click text in the preview to edit it directly. The selected layer's Style, Motion and Position settings stay below the tools. In Style, choose This layer, All layers or New layers, then click a style swatch. Automatic text spacing uses line height 1 for one line and 1.3 for wrapped text or line breaks.
The project name, save state, Save project and the .cropped file buttons share one row above the preview. Crop ratios and Browser frame stay in the row below it from every video tool. Timeline, Captions, Media and Export sit at the right of the play controls. Drag the divider above the lower tool dock to resize it; the Expand preview button beside the tabs hides the dock and gives the whole height to the video. The queue and Preferences stay visible when you open a video.
Paused annotations within their time range stay fully visible for editing. Use Preview animation or normal playback to see actual fades, reveals and opacity. See Video annotations, motion and saved styles for the full workflow.
The timeline
Every video opens on the same timeline the Studio uses for combining videos.
To see more detail, zoom the timeline: pinch on the trackpad, hold ⌘ Command and scroll, or use the small zoom control floating at the bottom right of the timeline. Zooming keeps the moment under the pointer in place, and goes from the whole video down to individual frames. Click the zoom amount (it reads Fit when the whole video shows), or double-click the slider, to fit the whole video again.
Its core lanes include:
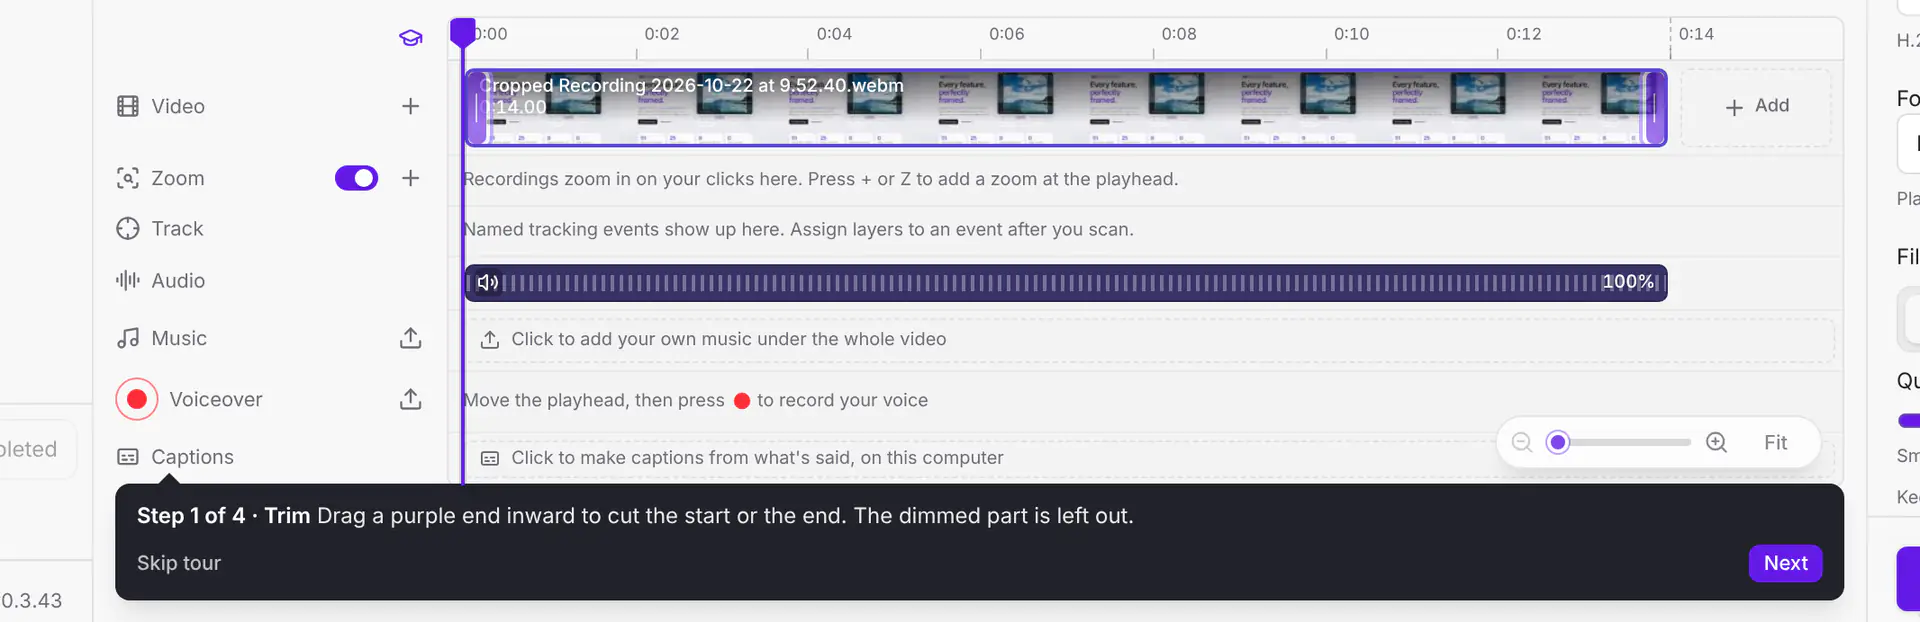
- Video: your video as a filmstrip. Parts you leave out are dimmed.
- Audio: the video's sound, with a mute button and a volume you drag up or down.
- Music and Voiceover: click the empty Music lane to add a song, or the red button to record your voice. See Combine videos, add music and a voiceover.
The purple playhead runs down through every lane. Drag its handle, or click or drag on the ruler, to scrub. The preview always shows the frame under the purple line.
Play and scrub
Press play under the preview. Playback skips the dimmed parts, so you watch exactly what you'll export.
| Key | Action |
|---|---|
| Space or K | Play or pause |
| ← Left arrow → Right arrow | Back or forward one frame |
| Shift ← Left arrow → Right arrow | Back or forward one second |
| Home / End | Jump to the start or end |
| A or + | Keep the part under the playhead |
| S | Split the clip at the playhead |
| I / O | Export from / to the playhead |
| Delete | Remove the selected clip |
Trim the start and end
To trim a video, hover the clip on the Video lane and drag the purple handle at either end. Near the ends the pointer turns into a two-way arrow and the + stays out of the way, so the handle is always there to grab. The part you cut off stays on the timeline, dimmed, so you can see what's left out. For exact times, click the clip and type them in From and to under the timeline.
While you drag, the preview shows the frame you're trimming to: the first frame you keep for the start handle, and the last frame you keep for the end handle. A label above the handle shows the time.
For a cut that's exactly right, trim frame by frame: hold the handle still.
- Hold for about half a second and the label says Fine. The handle now moves at a quarter of the speed.
- Keep holding and it says Frame with the frame number. Each small move now steps one frame, at the video's own frame rate.
- Let go when the preview shows the frame you want. The cut lands on that frame in the saved video.
With a handle focused, the arrow keys move it a tenth of a second, and Shift-arrow one second.
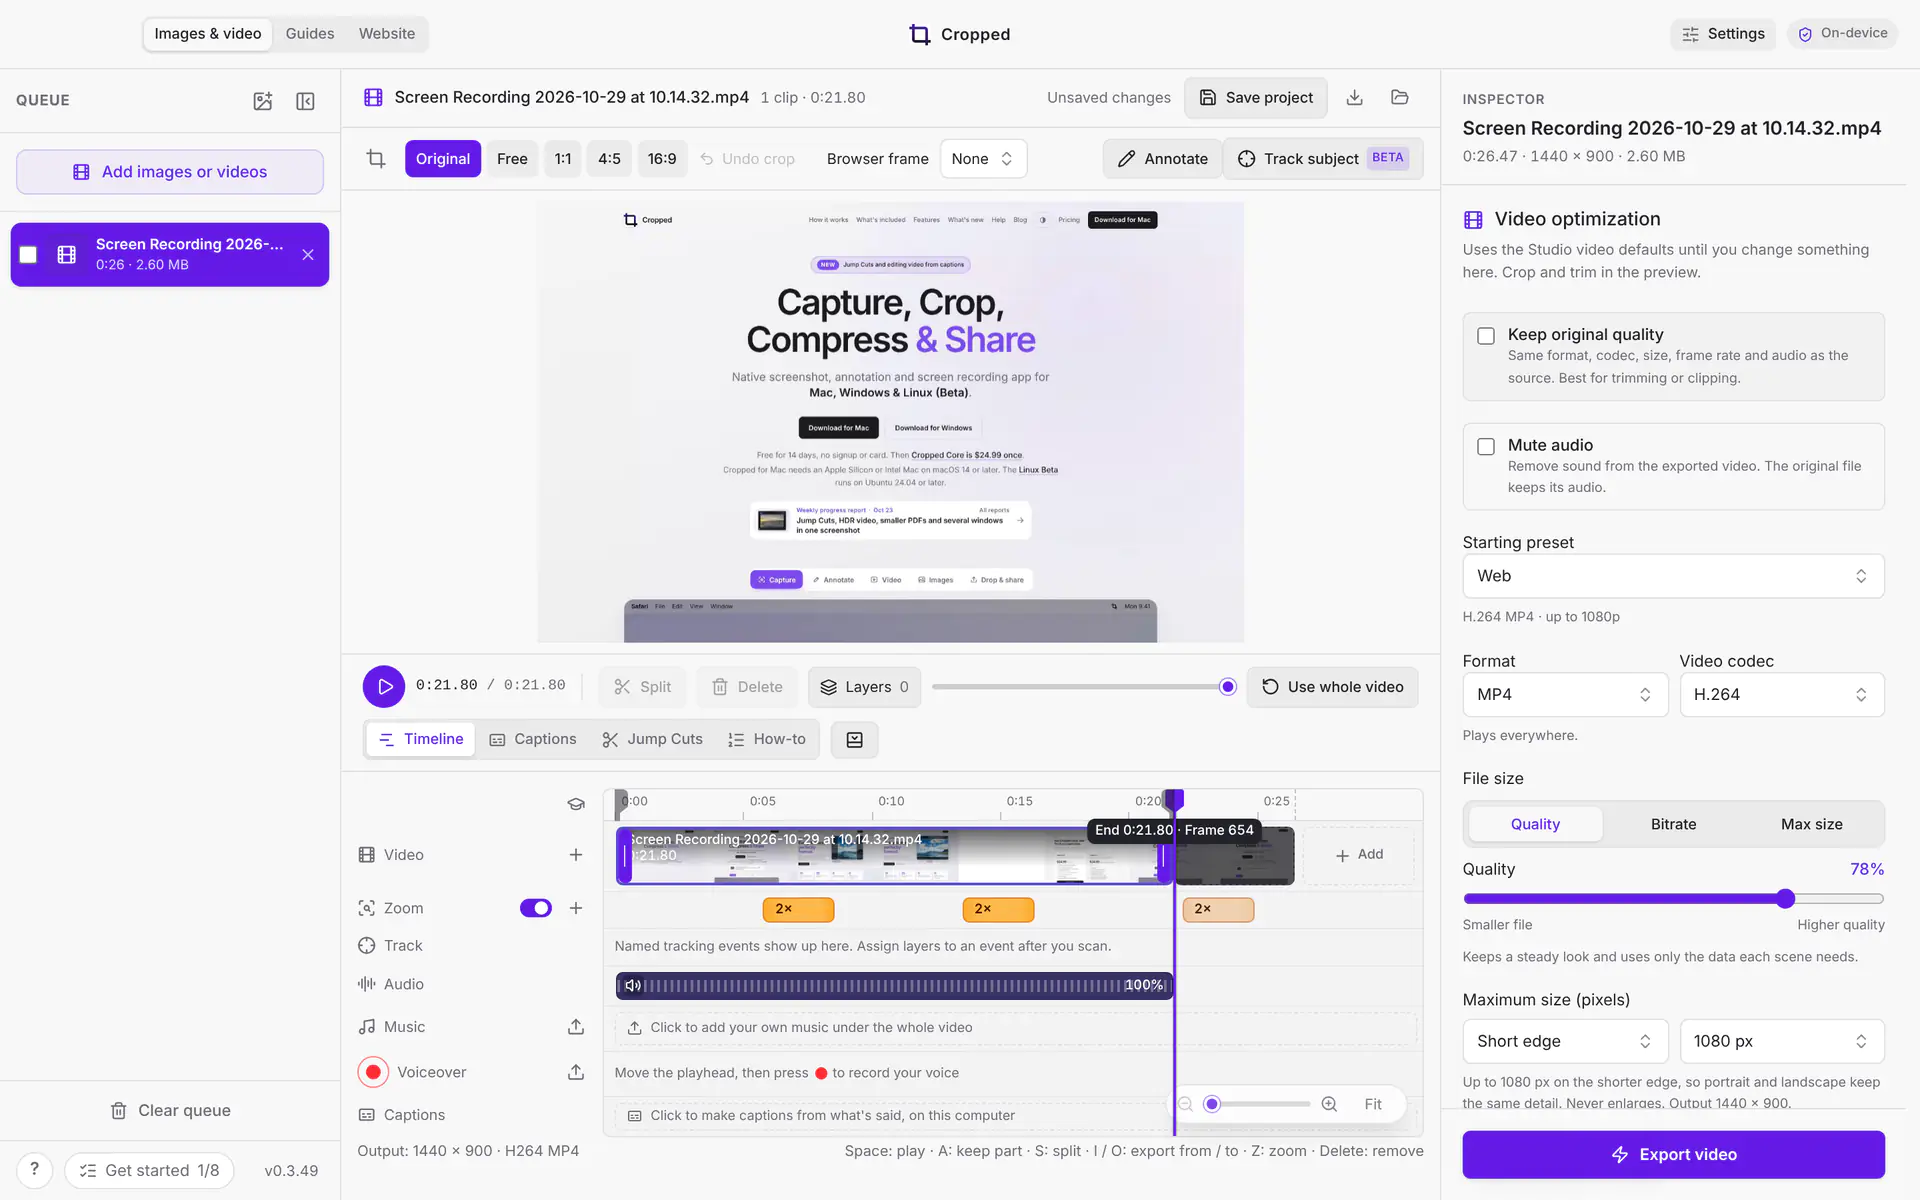
Export only part of a video
To save just one part of a video, say the 40 seconds that show a feature, use the two trim points on the timeline's ruler. Your edit stays as it is; only the export is shorter.
- Drag the flag at the left end of the ruler to where the export should start. The preview shows that frame while you drag.
- Drag the flag at the right end to where it should stop.
- Click Export part.
Everything outside the two flags dims on every lane, the ruler's corner says how long the part is, and the line under the timeline shows its start and end. Clips, sound, music, voiceover, captions, zooms and layers in the part all come along, timed from the part's start. Music picks up where the part begins.
You can also move the playhead and press I to start the part there, or O to end it there. To export the whole video again, click × beside the part's length, or drag both flags back to the ends. The trim points are saved with the project.
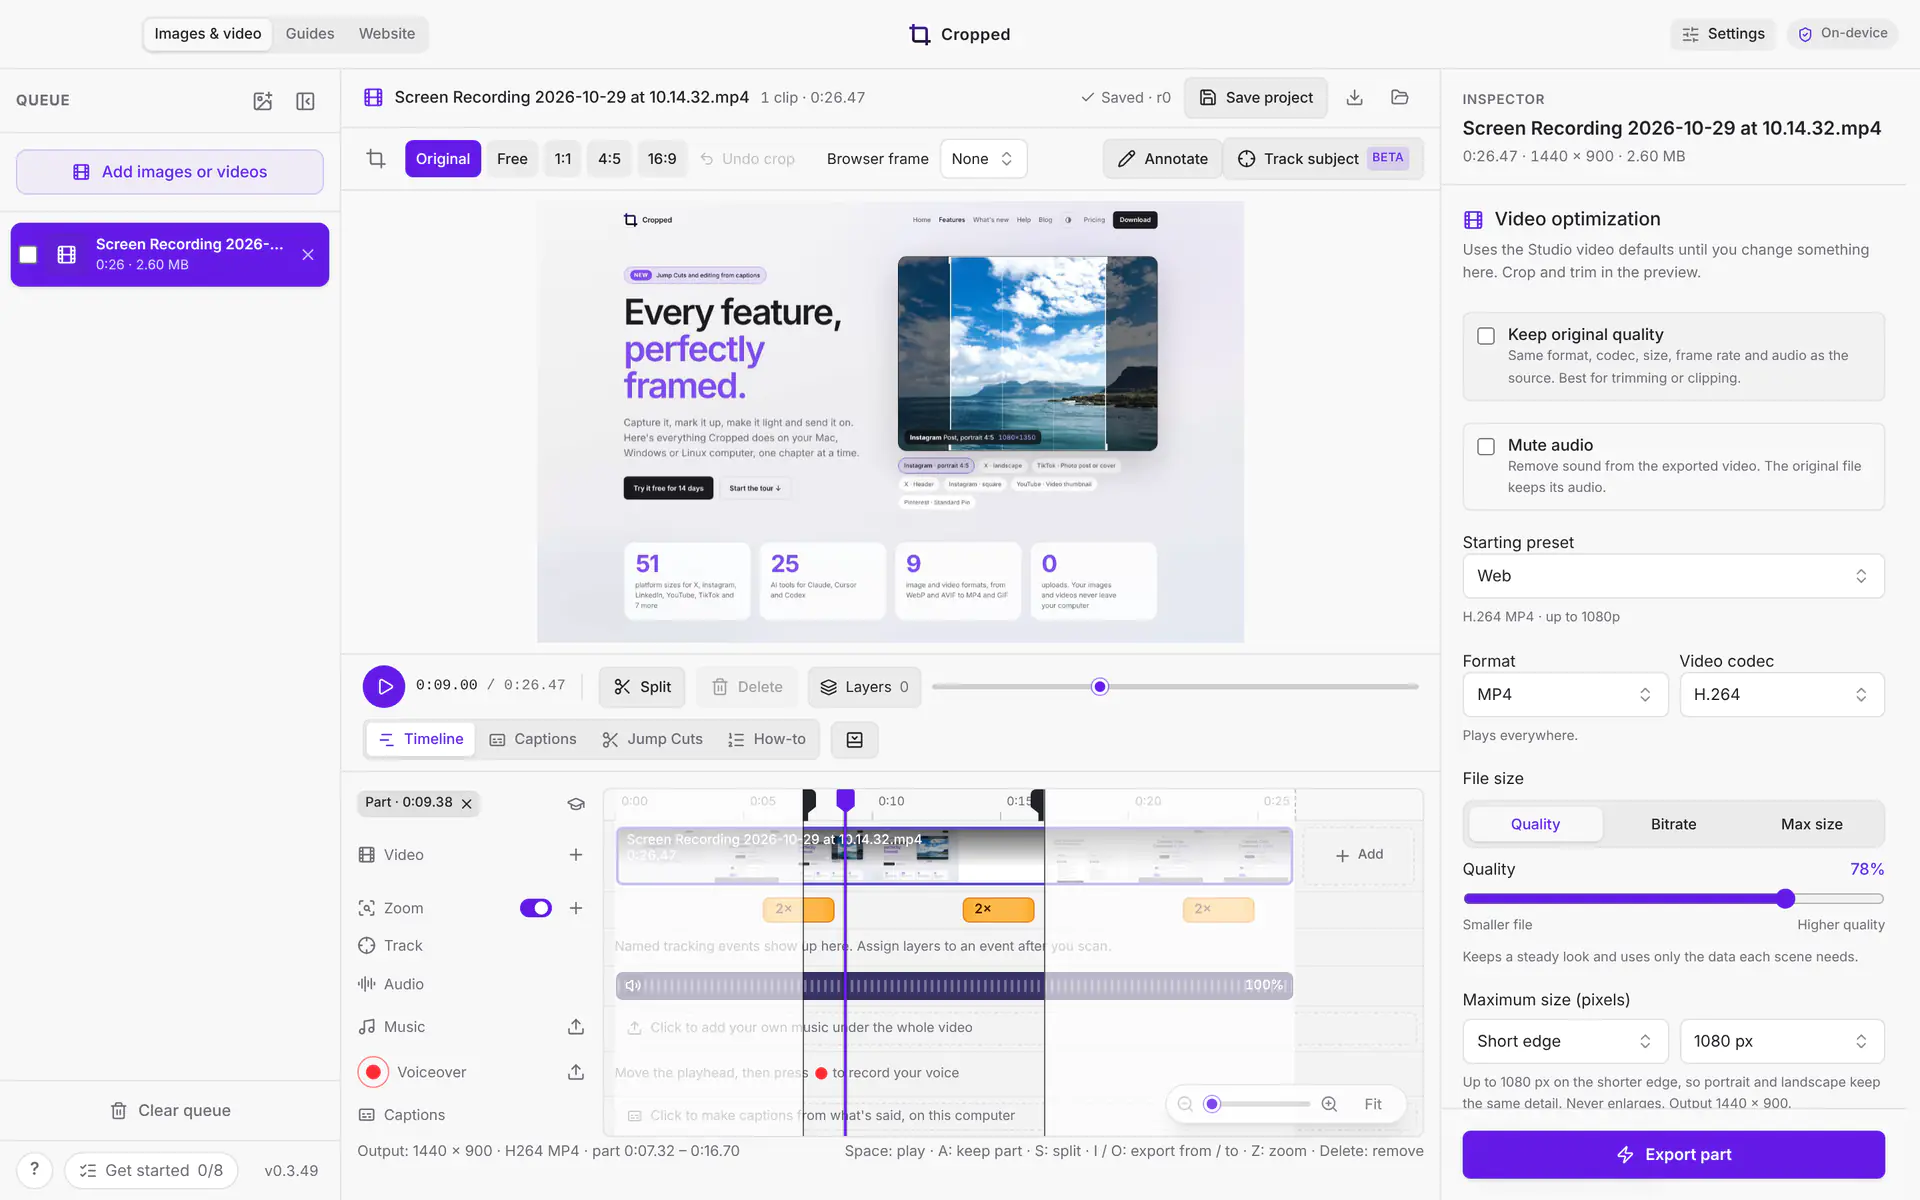
Pick several clips
Keep only the good parts of a long video. Cropped joins them in order when you export.
- Hover the video on the timeline. A + appears where your pointer is, except right next to the ends, where the trim handles are.
- Click + to keep a few seconds there. The rest of the video dims.
- Drag the clip's purple ends to set where it starts and stops.
- Hover a dimmed part and click + again for the next clip.
- Hover a clip and click its ×, or select it and press Delete, to remove it.
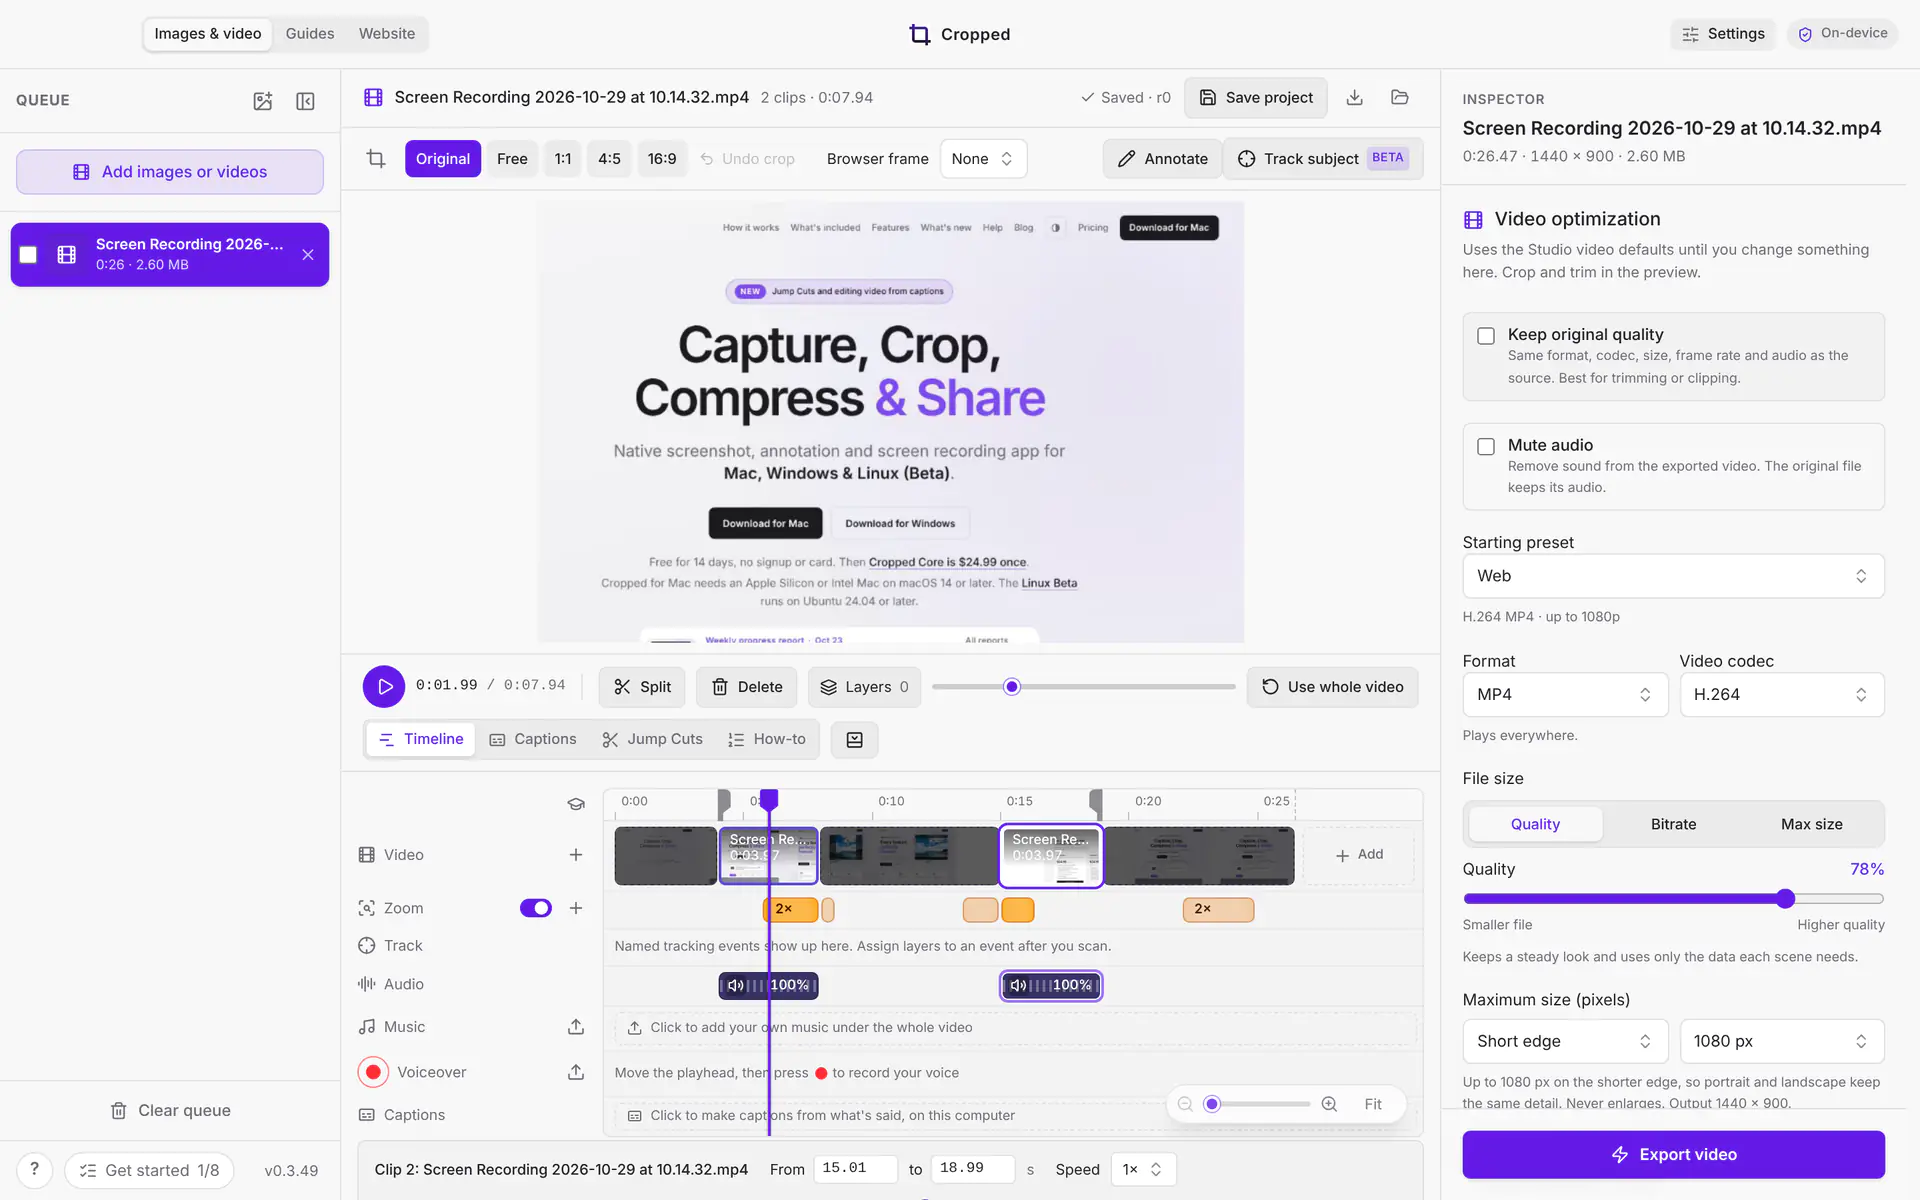
The header shows the number of clips and the length of your export. Use whole video goes back to all of it.
You can also split a clip at the playhead with S, drag clips into a new order, or turn one clip's sound down. Those work the same as in a sequence.
Learn it with the clipping tour
Click the How to clip button (the graduation cap above the lanes) for a four-step tour on the video you have open. Each step rings the control it's about and moves on by itself once you've done it:
- Trim: drag a purple end inward.
- Keep another part: hover the timeline and click +.
- Adjust or remove: drag a clip's ends, or click its ×.
- Save it: Export video joins your clips into one video.
The tour is offered once, the first time you open a video. Skip tour or Esc closes it, and How to clip starts it again anytime. You can also reach it from Get started › Trim a recording or video.
Sound
Click the speaker on the Audio lane to mute the video's sound, or drag the sound up or down to make it louder or quieter. Select a clip to set an exact Clip volume or click Mute clip; with several clips, each one has its own sound. To remove the audio track from the exported file completely, turn on Mute audio in the video's output settings. The original file keeps its sound either way.
Add videos, music or a voiceover
Click + on the Video lane, or the Add space at the end of the timeline, to add more videos or images. Click the empty Music lane to add a song, or the red record button on the Voiceover lane to talk over the video. Dropping several videos at once? Choose As one edit to put them all on one timeline. See Combine videos, add music and a voiceover.
Captions
Click Captions under the preview to make captions from what's said, right on your computer. Edit and time them on the Captions lane, pick a look, then burn them into the video or save an .srt or .vtt file next to it. See Add captions to a video.
Smooth playback
Cropped plays your original file in the preview. For heavy videos, such as 4K, HDR, high frame rate or ProRes, it makes a smaller fast preview copy in the background and switches to it, so scrubbing and playback stay smooth. Exports always use the original. A Fast preview badge shows while it's in use; turn Fast previews off in Preferences › General › Video imports to always play the original. See Fast previews.
Crop a video
Pick a ratio above the preview: Original (the default), Free, 1:1, 4:5 or 16:9. Then drag the crop box or its handles.
- Hold Shift to keep the ratio, or Option (Windows: Alt) to resize from the center.
- Arrow keys move the crop 1 pixel, and Control-arrow 10 pixels.
- For exact values, open Precise crop dimensions on the right. Videos are encoded at even pixel sizes, so odd values round down by one.
- Undo crop steps back, and the crop button hides the overlay.
Export
Choose a preset or your own settings under Video optimization on the right (see Video formats and presets), then click Export video at the foot of the Inspector. To keep the original quality and only cut or crop, tick Keep original quality at the top of Video optimization (see Keep the original quality). Cropped shows progress, speed and time left. When it's done, click Show saved video. The saved video has exactly what the timeline plays: only the clips you kept, each at its own volume, plus any music and voiceover you added.
To use the same settings for every new video, click Use as defaults for new videos.
If a video won't preview
If the preview can't play a video's format, Cropped makes a playable copy in the background and shows it as soon as it's ready. You can trim, crop and export in the meantime. The export always uses the original file.
GIFs open in a simpler editor with a clip strip and Create compatible preview.
Still stuck? Click the ? button at the bottom left of the Cropped Studio to ask, send us a message, or request a feature.