 Cropped
Help
Help / Crop, optimize & export
Optimize and compress images
Cropped turns large photos and screenshots into small files that look the same. Pick a preset, or set the format, quality and size yourself. Your original is never changed.
Quick answer: drop the image on the Drop Zone to shrink it in one step. Or open it in the Studio, pick what it's for under Optimize for (Web is WebP, 85% quality, up to 1920 px wide) or choose WebP, AVIF, JPEG or PNG yourself, and press ⌘ Command + ↩ Return (Windows: Ctrl + Enter). The smaller copy goes to Downloads/Cropped.
Optimize for
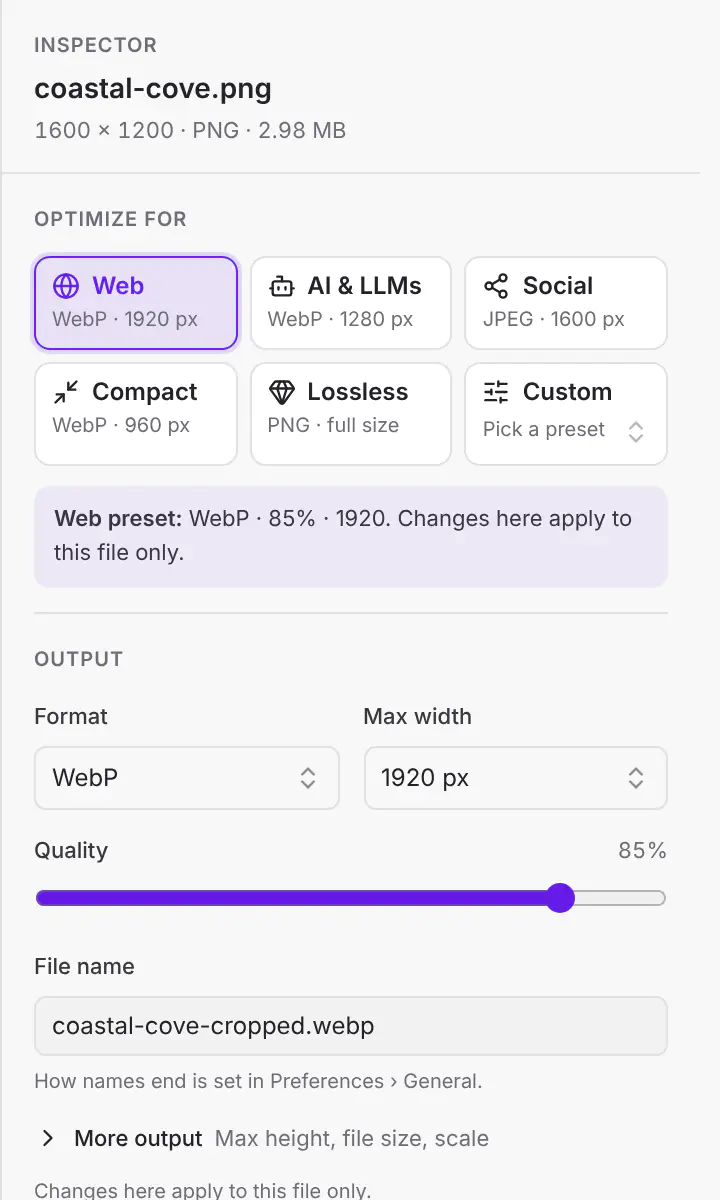
At the top of the Studio panel, Optimize for asks what the picture is for, and picks the format, quality and size for you:
| Card | Preset it uses | Good for |
|---|---|---|
| Web | Web: WebP, 85%, 1920 px | Websites and blogs |
| AI & LLMs | Agent / LLM: WebP, 80%, 1280 px then 50% | Pasting into ChatGPT, Claude, Cursor or Codex with fewer image tokens |
| Social | Share: JPEG, 82%, 1600 px | Posting, email and apps that don't open WebP |
| Compact | Web · compact: WebP, 78%, 960 px | Thumbnails and small embeds |
| Lossless | Print: PNG | Printing, archiving and exact copies |
| Custom | Any other preset, including your own |
The line under the cards spells out the recipe. Each card is a preset, so changing a setting below changes that preset; save a copy to keep both versions.
Pick a preset
Under Studio output › Image, choose a Preset, or pick it under Optimize for. Each one sets the format, quality and size in one go.
| Preset | Format | Quality | Max width | Good for |
|---|---|---|---|---|
| Web | WebP | 85% | 1920 px | Websites and blogs (Studio default) |
| Share | JPEG | 82% | 1600 px | Email and apps that don't open WebP |
| Agent / LLM | WebP | 80% | 1280 px, then 50% | Pasting into ChatGPT, Claude or other AI tools with fewer tokens (Drop Zone default) |
| PNG | Lossless | Original | Printing and archiving | |
| Web · compact | WebP | 78% | 960 px | Thumbnails and small embeds |
| Web · AVIF | AVIF | 65% | 1920 px | The smallest files for modern browsers |
| Photo · high quality JPEG | JPEG | 92% | 2560 px | Photographers and portfolios |
| Thumbnail · WebP | WebP | 80% | 640 px | Product grids and previews |
Format, quality and size
| Setting | Choices |
|---|---|
| Format | WebP, AVIF, JPEG or PNG. WebP, AVIF and PNG keep transparency. JPEG fills transparent areas with white. |
| Quality | 1 to 100%. Lower is smaller. Start around 80% and lower it until you can see a difference. Hidden for PNG, which is lossless. |
| Max width | Original, 3840, 2560, 1920, 1280 or 1080 px, or type a Custom width. Images are never enlarged. |
| Max height | Original, 2160, 1440, 1080 or 720 px, or type a Custom height. Tall screenshots and portrait photos shrink to fit, keeping their shape. With both limits set, the image fits inside both. |
| Max file size | Off, 100 KB, 250 KB, 500 KB, 1 MB, 2 MB, 5 MB or 10 MB, or type a Custom file size in KB. See Keep images under a file size. |
| Scale % | Shrinks the result further, from 1 to 100%. |
Which format should I use?
- WebP is the best all-rounder: small, sharp, and works in every modern browser and most apps.
- AVIF is often smaller still, but takes longer to make and some older apps can't open it.
- JPEG opens everywhere, including old email clients and print shops.
- PNG is lossless. Use it for print, pixel art or when you need an exact copy.
The image encoders load the first time you optimize after opening Cropped, so that first image can take a moment longer. The Studio and the Drop Zone open faster because they don't load them up front.
Save your own preset
Change any setting, then click Save settings as an image preset and give it a name. Your presets show up in the Studio and in the Drop Zone. Changing a preset's settings updates it; save a copy to keep both versions.
Optimize
- Press ⌘ Command + ↩ Return (Windows: Ctrl + Enter) or click the main Optimize button at the foot of the Inspector to process the whole queue.
- This file only, next to the main button, processes only the open file.
- With images ticked in the queue, Apply to N checked copies the open image's settings to them.
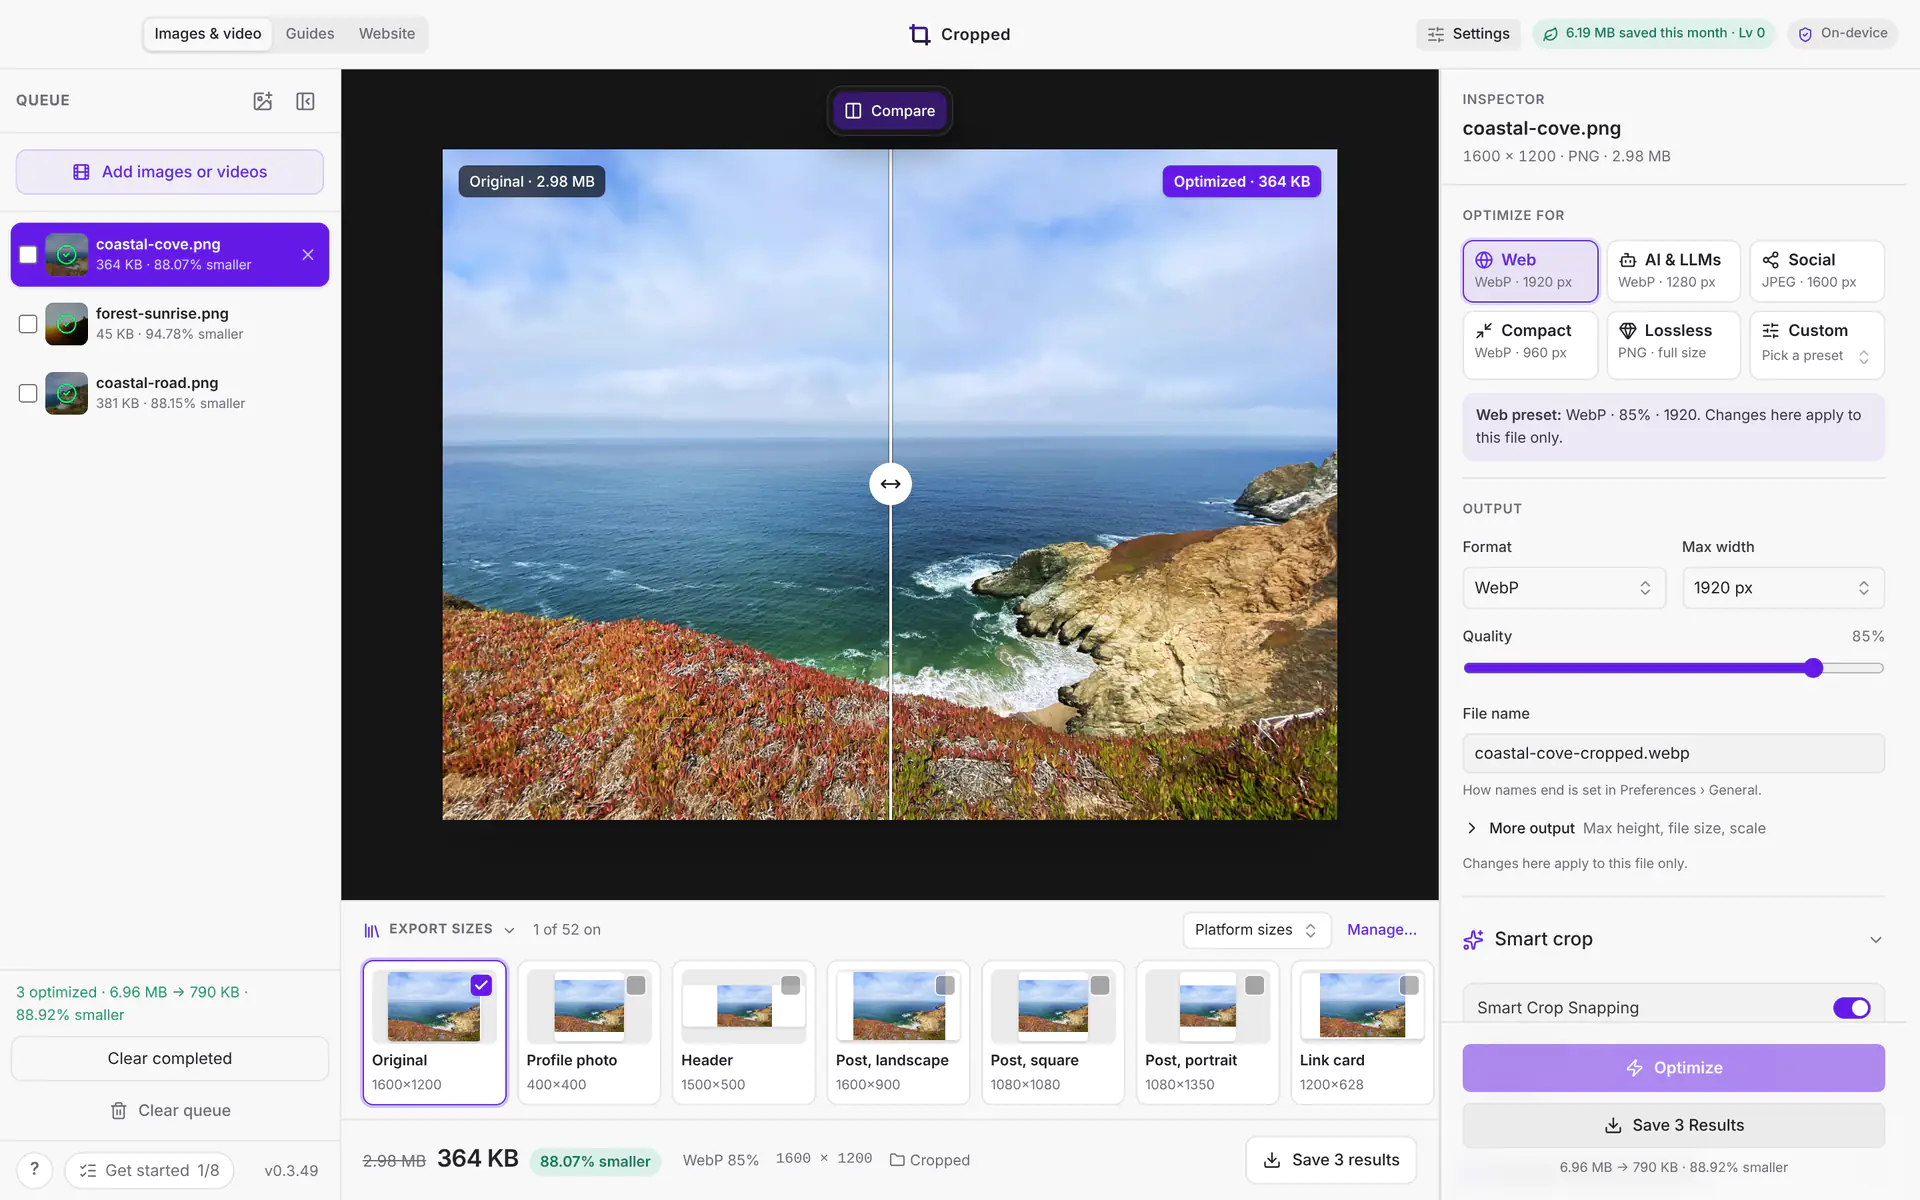
- After optimizing, the result bar and File size show the original size, the new size and how much you saved.
- Several images are optimized at once, so big batches finish sooner. How many at a time depends on your computer's processor.
The result bar
The bar under an open image shows what you'll get: the size before and after (or Optimize to see the new size until it's done), how much smaller it got, the format and quality, the output dimensions (or how many export sizes are ticked) and the save folder. Its buttons are Show in Finder (File Explorer on Windows, your file manager on Linux) and Save results.

Compare before and after
After optimizing, click Compare on the picture toolbar. The original is on the left of the handle and the optimized file on the right. Drag the handle, or use the arrow keys (hold Shift for bigger steps), to look closely at text and edges. Click Compare again to go back to cropping.
Never bigger than the original
Some files are already as small as they can get. If optimizing a whole, uncropped image in the same format (PNG to PNG, or JPEG to JPEG) would make it bigger, Cropped saves your original image instead, so the result is never larger. Hidden details such as the camera, location and comments are still removed, as they are from every export.
This doesn't apply when you crop, resize, rotate or change the format, because the result is a different picture or file type. A JPEG that a camera stores sideways and turns with a hidden tag is always re-encoded, so it still displays the right way up.
Keep images under a file size
Set Max file size when a site or app has an upload limit, such as 1 MB. Cropped first lowers the quality, but not below 40%, where pictures start to look blocky. If that still isn't small enough, it makes the image smaller in pixels too, keeping its shape. PNG is lossless, so it only gets smaller in pixels.
Platform sizes keep their exact pixels, so only the quality comes down. If an image still can't fit, Cropped saves the smallest version it made and File size says the target was missed.
Fitting a size takes a few extra tries per image, so optimizing is a little slower with it on.
Wide color
Mac screenshots and iPhone photos are often in Display P3, a color space with richer reds and greens than standard color (sRGB). Exports are saved in standard color so they look the same everywhere, which can make very saturated colors slightly duller. When that happens, File size shows a note naming the image's color space. If you need the exact colors, use the original file.
Saving and file names
Under Studio output › Saving:
| Setting | What it does |
|---|---|
| Folder | Where files are saved. Downloads/Cropped unless you pick another. New folder makes one, and Show in Finder opens it. |
| File name | Add “-cropped” (photo-cropped.webp), Add “-optimized” (photo-optimized.webp), Keep the original name (photo.webp) or Add my own ending. The Ending box under it is always there: type any ending, such as -web, and it's used from then on. |
| Auto-save after optimize | Saves as soon as each file is optimized. Off by default, so you can check results first and press ⌘ Command + S. |
| Show saved files in Finder | Opens the folder after saving. On by default. |
Cropped never overwrites a file. If the name is taken, it adds -2, -3 and so on. The naming style is shared with the Drop Zone.
Still stuck? Click the ? button at the bottom left of the Cropped Studio to ask, send us a message, or request a feature.