 Cropped
Help
Help / Crop, optimize & export
Crop images and export social media sizes
Crop by hand, let smart crop find the subject, or tick a list of social media sizes and export them all at once.
Quick answer: open the image in the Studio, pick a ratio such as 1:1, 4:5 or 16:9 (or drag the crop box), tick the sizes you need under Export sizes, and click Optimize & Save. Cropped saves one file per size. Every built-in size, with pixels and ratios, is in Social media image sizes.
Crop an image
- Open an image in the Studio.
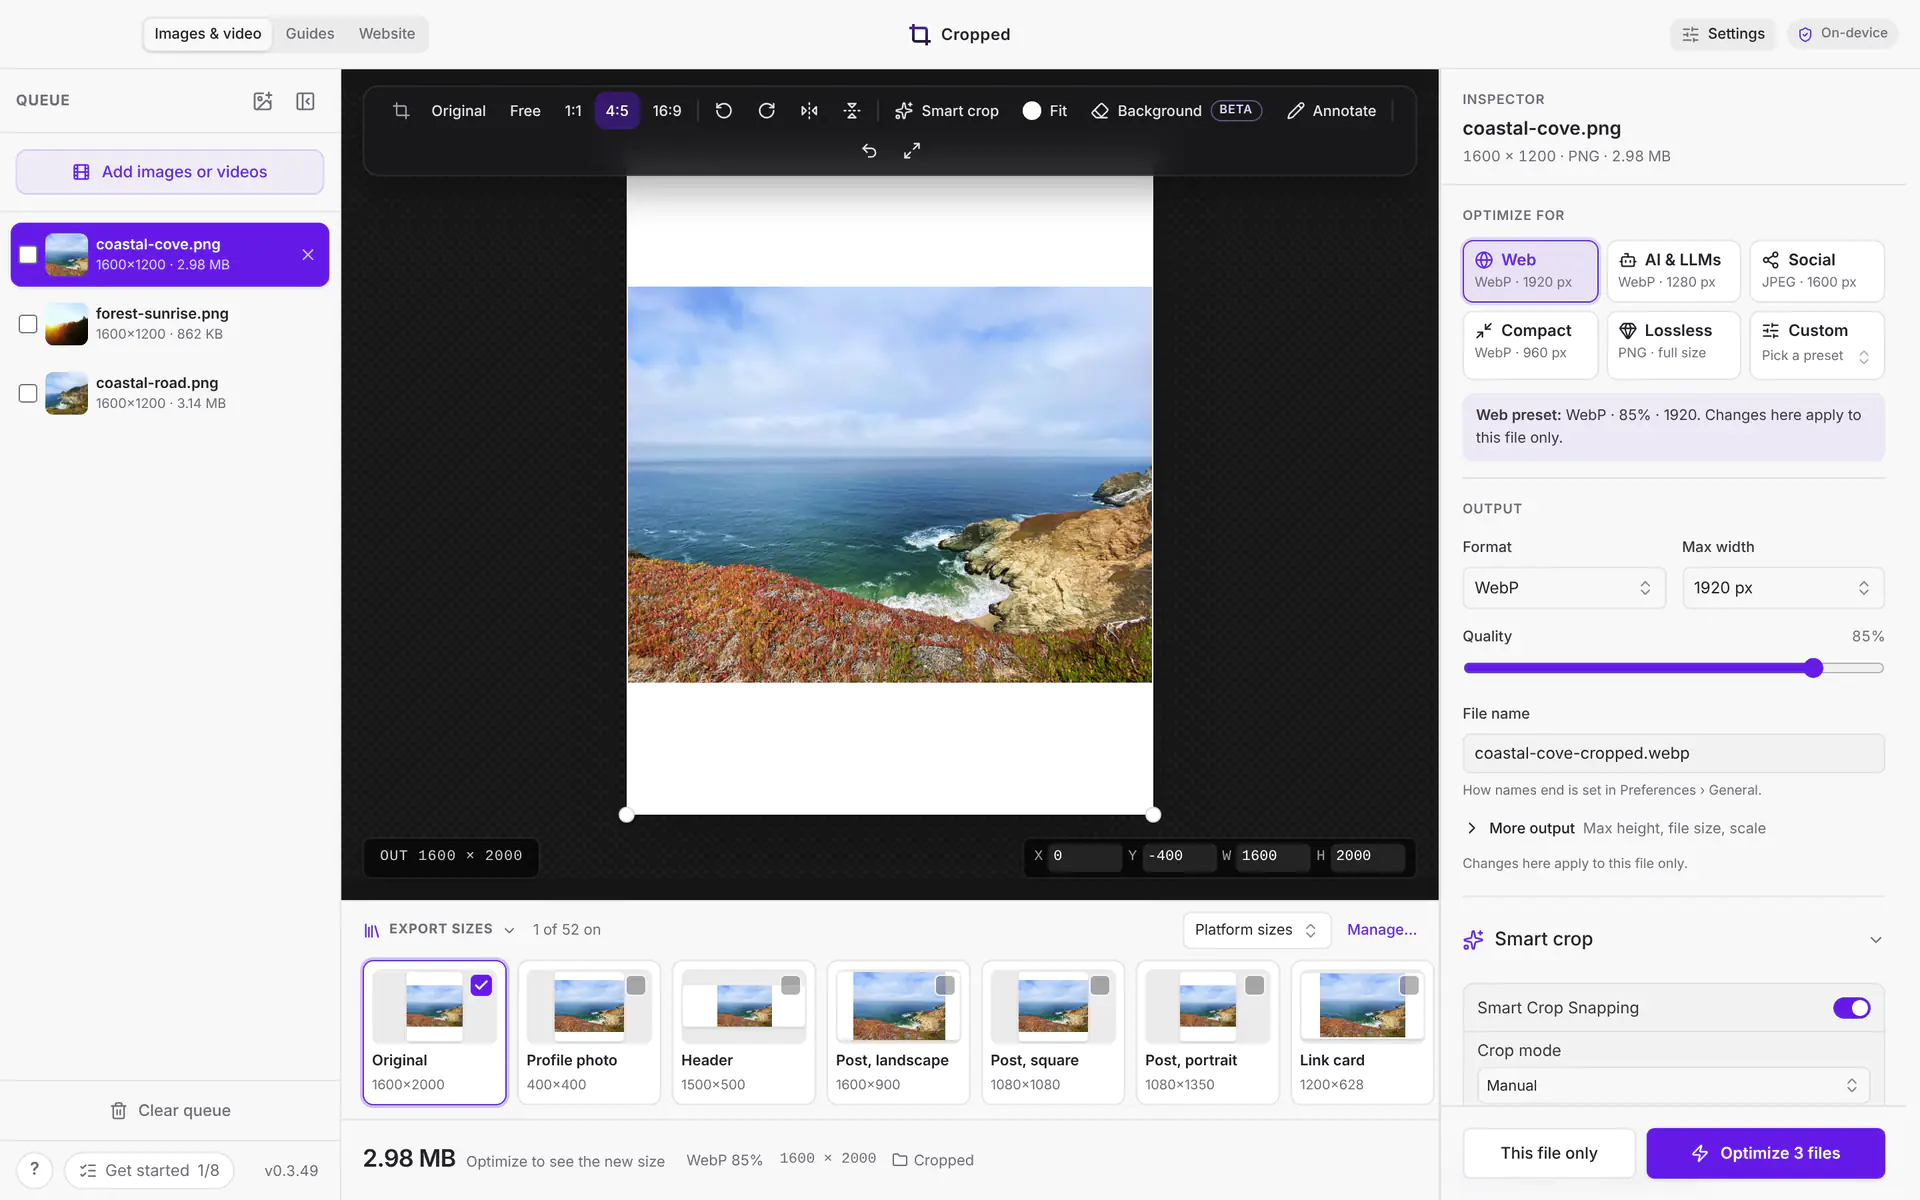
- Pick a shape on the picture toolbar above the image: Original (the image's own shape, the default), Free, 1:1, 4:5 or 16:9. With no image open, the same choices are under Crop in the Studio panel.
- Drag the crop box to move it, or drag a corner or edge to resize it.
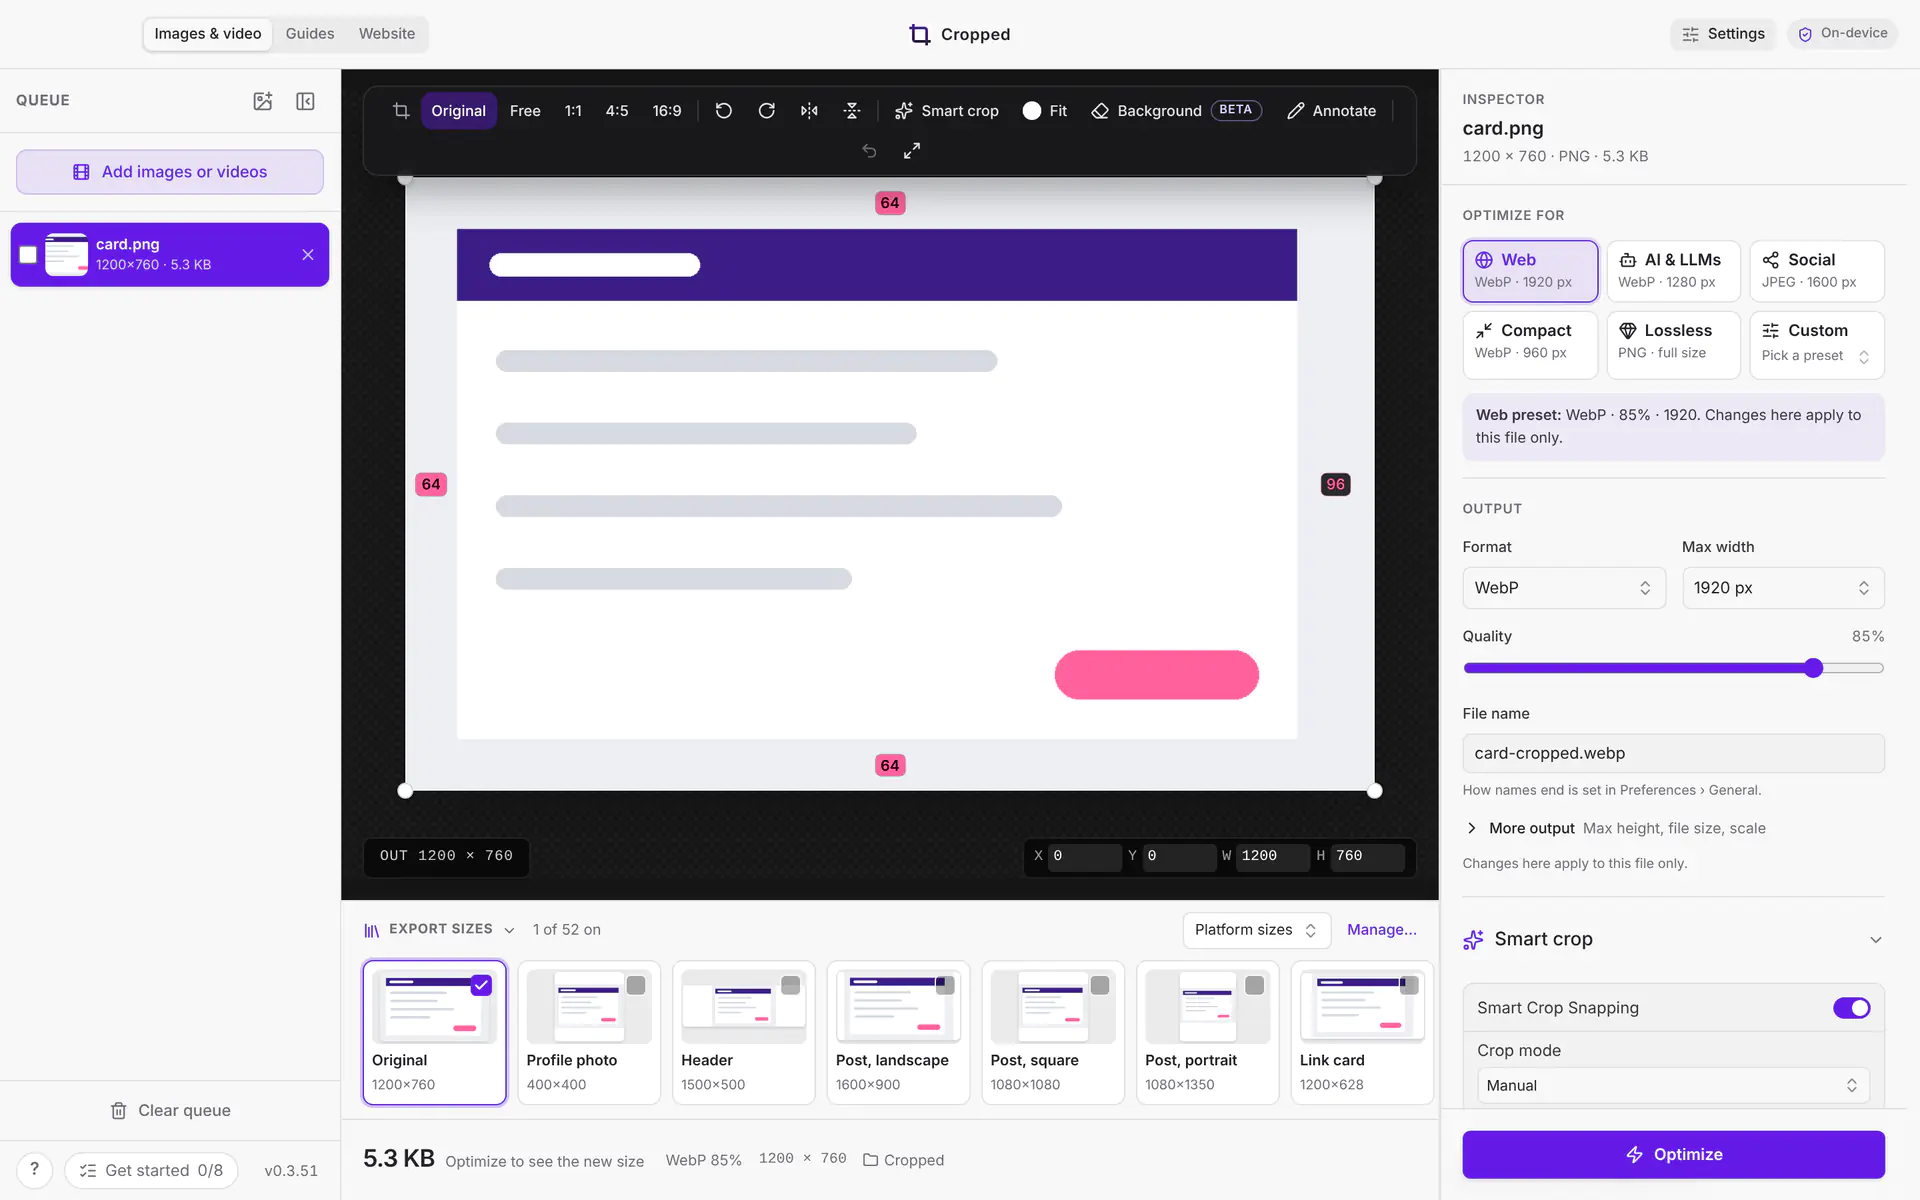
- The crop snaps to edges in the picture, like a window, card or panel, and offers the same padding on every side. A pink line marks each snapped edge. Numbers on each side show the space between the crop and the content inside it, the whole time the crop is on screen, each in the middle of a dashed line across the gap it measures. Click a number, type a value and press Return (Windows and Linux: Enter) to set that side's padding exactly. You can change their color and size in Padding numbers. Hold ⌘ Command (Windows: Ctrl) while dragging to place it freely.
- Hold Shift while dragging to keep the current ratio.
- Hold Option (Windows: Alt) to resize from the center.
- With the crop selected, the arrow keys move it 1 pixel, Shift-arrow 10 pixels, and Option-arrow resizes it.
- Type exact values in the X, Y, W and H fields at the bottom right. They're in pixels of the original image.
OUT at the bottom left shows the size of the file you'll get, and the W and H fields show the crop size.
The ratio you pick also becomes the starting crop for new images and videos.
Rotate and flip
Use the buttons on the picture toolbar: rotate left, rotate right, flip horizontally and flip vertically. Undo steps back one crop change, and Reset returns to the original image.
Smart crop
Click Smart crop on the picture toolbar to center the open image on its subject once. To keep doing it, set Crop mode to Smart under Smart crop in the Studio panel and set Fill to Crop. Cropped finds the main subject and keeps it in frame when the ratio changes. It runs on your computer and works offline. Use Apply smart crop to selection to apply it to the files ticked in the queue.
Fit, background color and AI fill
When a shape or export size doesn't match the picture, for example a square post of a landscape photo, Fill decides what happens. Click Fill on the picture toolbar (it shows the current choice, such as Fit). With no image open, it's under Fill in the Studio panel.
- Fit (the default) keeps the whole picture inside the frame and fills the rest with a color: white, black, light gray, charcoal, see-through, or any color you pick. See-through saves as transparent in PNG, WebP and AVIF, and as white in JPG.
- Crop fills the frame with the picture and cuts what doesn't fit, centered or around the subject with smart crop.
- Extend keeps the whole picture and fills the gaps from its own edges, on your computer.
- AI fill keeps the whole picture and has your image provider paint the missing scenery so it looks like one larger photo. It uses the OpenAI, Gemini or compatible key you connected in Preferences › AI tools › Provider connections and is billed by that provider. Cropped sends the picture straight from your computer to the provider and pastes your original pixels back on top, so only the new edges are made by AI, and AI never adds text. Add a few words under Describe the new edges to steer it, such as "more sky and sand".
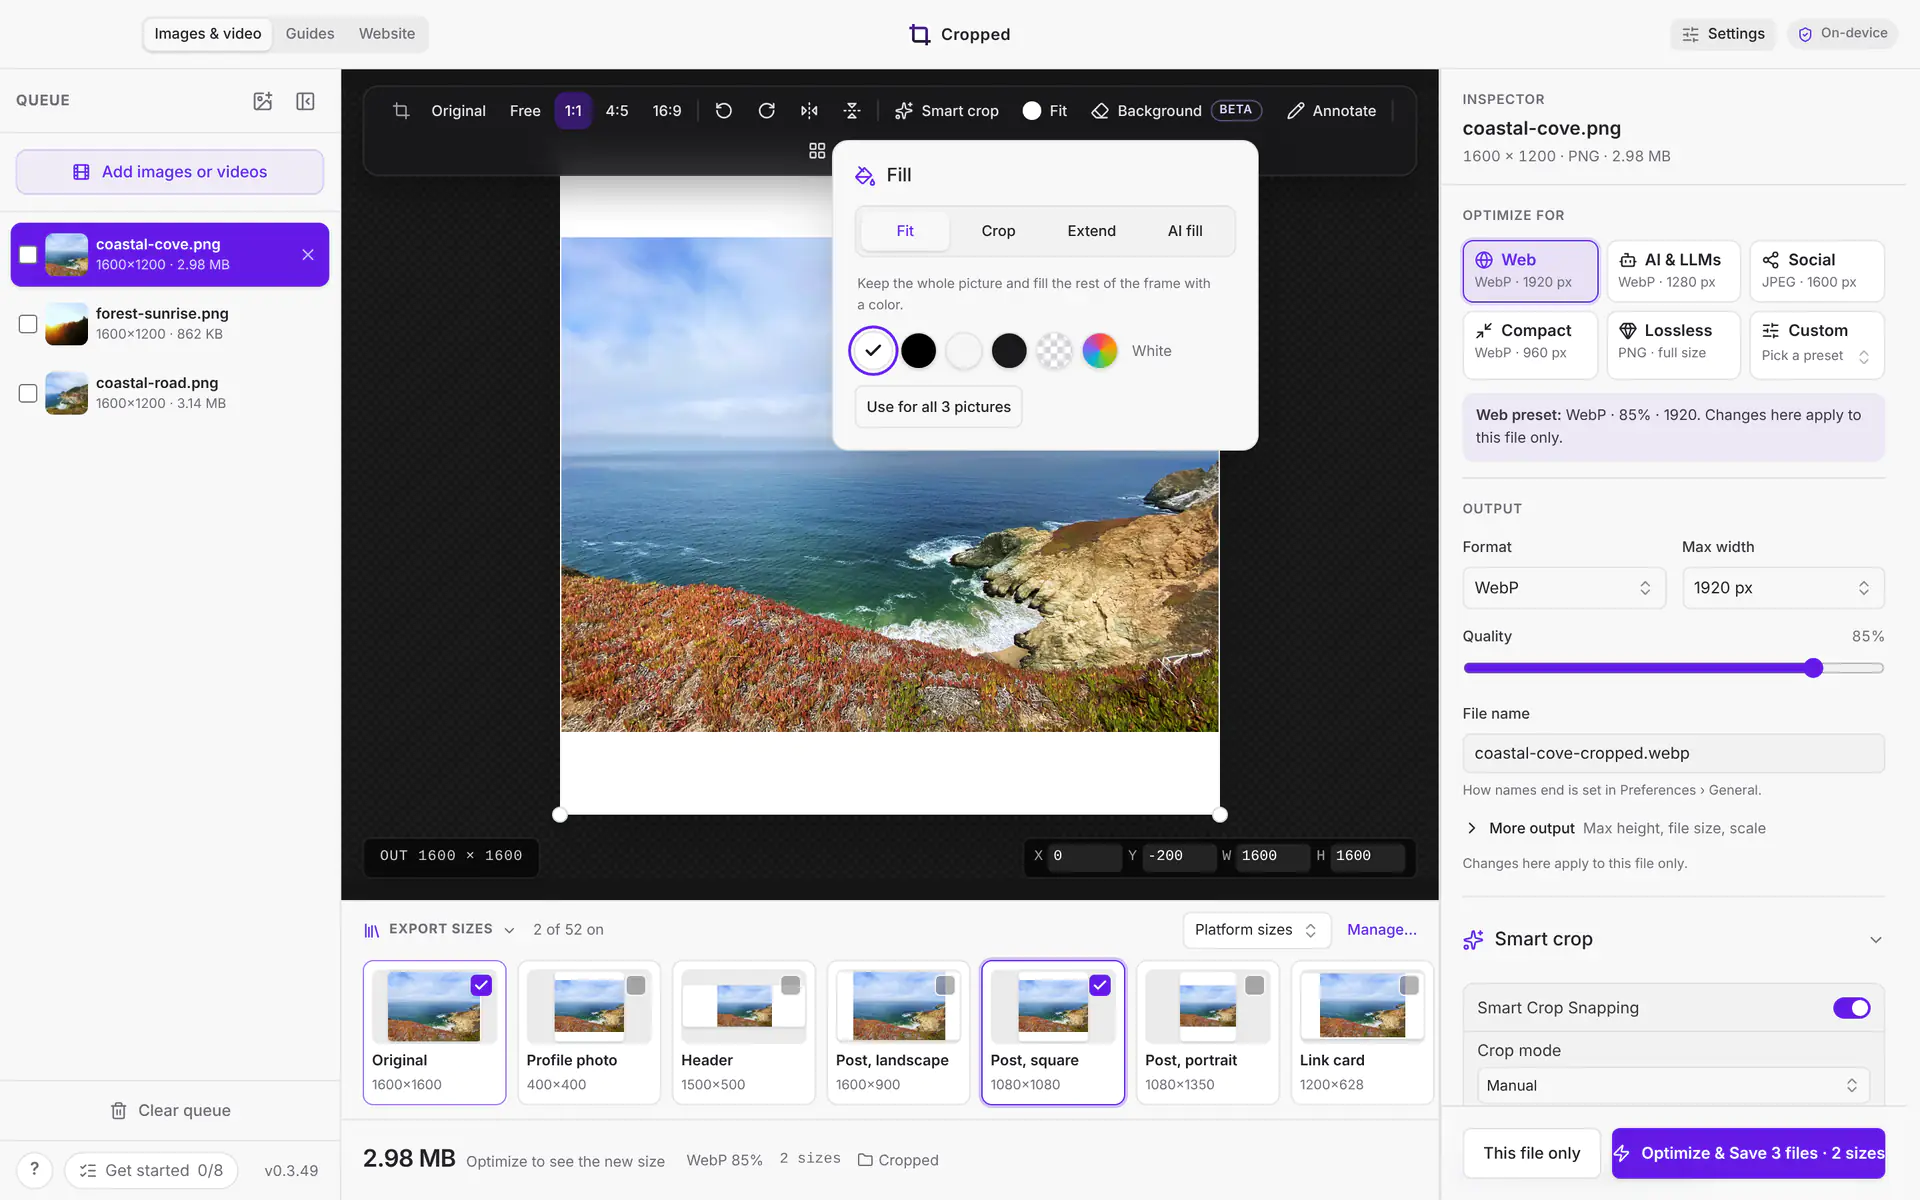
With Fit, Extend or AI fill, a fixed shape such as 1:1 starts as the frame around the whole picture, so the crop box reaches past the photo and you see the fill. Drag a corner inwards to zoom in, and drag the box to move it. A size you frame yourself keeps your framing.
AI fill makes one picture per frame shape, so a set of social sizes needs only a few. Click Make AI fill to make them now and see them on the canvas, in Frames and in the Export sizes row. Anything still missing is made when you optimize. If AI fill can't run, the edges use the background color and Cropped tells you why.
Many pictures at once
Each picture keeps its own fill, and the one you pick also becomes the starting fill for new pictures. To use it on the whole queue, click Use for all in the Fill menu. With AI fill, AI fill all makes what every picture in the queue needs, two at a time, before you optimize them together.
Export sizes for social media
Under the picture, Export sizes shows a live preview of every size in the chosen collection. Tick the box on each size you need, and pick another collection from the menu on the right. Click a preview to show that crop on the canvas, so you can check the framing, and drag it to frame that size differently. Each size keeps the framing you gave it, and Original keeps your own crop and shape lock. Click the size that is already on the canvas to frame it afresh. Sizes you never framed keep the whole picture with Fill set to Fit (the default), or are cut to fill the frame with Crop, centered or framed on the subject with smart crop. Then click Optimize & Save: Cropped saves one file per size, never enlarging a small image. If your format is WebP or AVIF, each size also gets a PNG or JPG copy, because most social networks don't take WebP or AVIF uploads; see PNG and JPG copies for posting. To check and adjust every size side by side, use Frames.
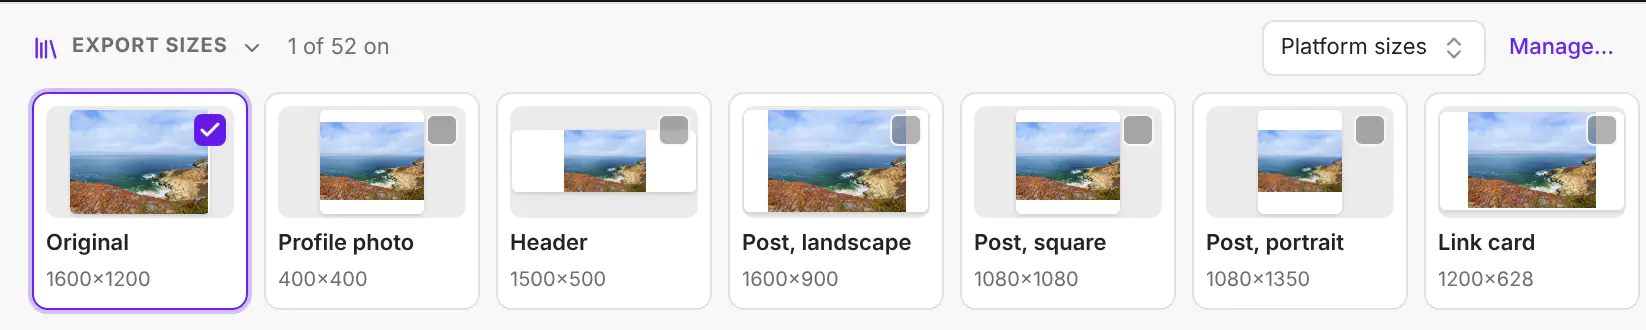
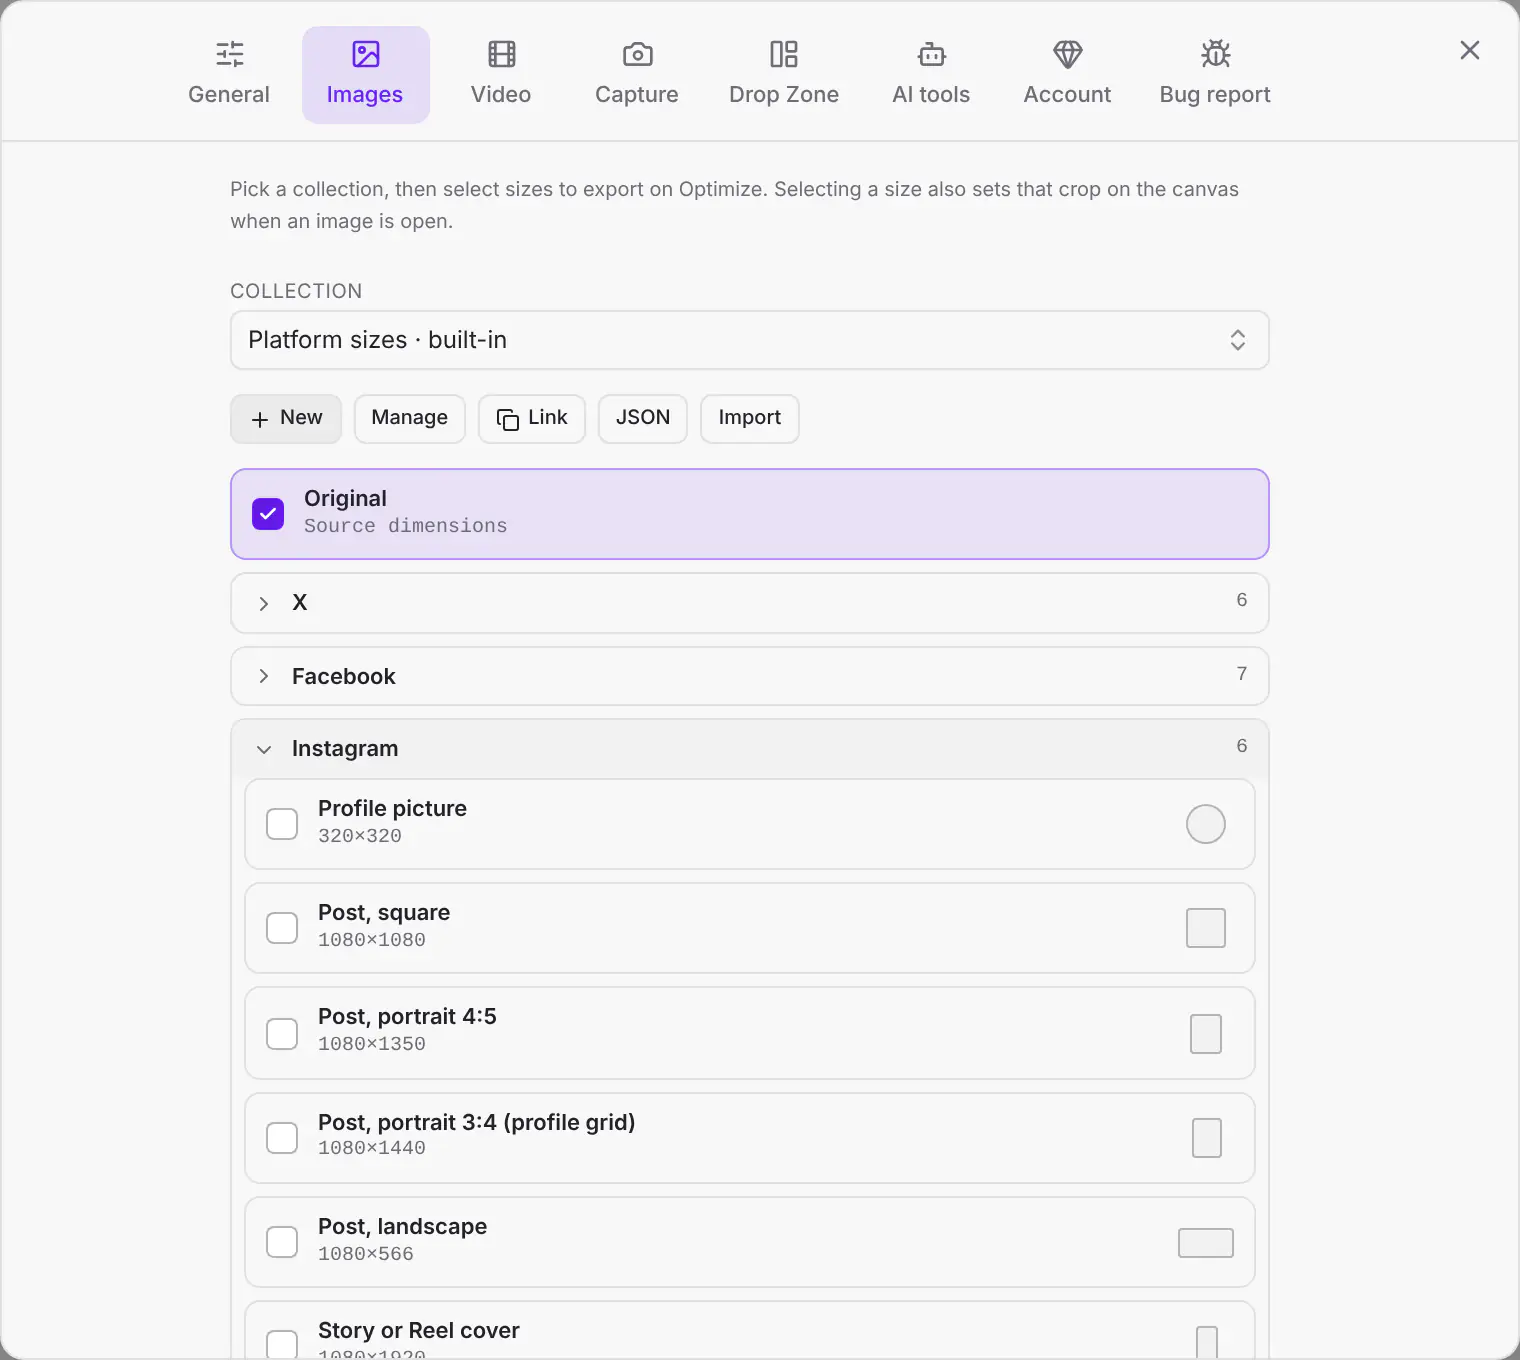
The Export sizes section in the Studio panel lists the same sizes grouped by network, and is where you make and share your own collections.
Files are named after the size, for example photo-cropped-x-header-1500x500.webp.
Built-in platform sizes
| Platform | Sizes |
|---|---|
| X | Profile photo 400×400, Header 1500×500, Post landscape 1600×900, Post square 1080×1080, Post portrait 1080×1350, Link card 1200×628 |
| Profile picture 320×320, Cover photo 851×315, Post square 1080×1080, Post portrait 1080×1350, Link share 1200×630, Story 1080×1920, Event cover 1920×1005 | |
| Profile picture 320×320, Post square 1080×1080, Post portrait 4:5 1080×1350, Post portrait 3:4 (profile grid) 1080×1440, Post landscape 1080×566, Story or Reel cover 1080×1920 | |
| Profile photo 400×400, Profile background 1584×396, Company logo 400×400, Company cover 1128×191, Post landscape or link 1200×627, Post square 1200×1200, Post portrait 1080×1350, Article cover 1920×1080, Event banner 1776×444 | |
| YouTube | Profile picture 800×800, Channel banner 2560×1440, Video thumbnail 1280×720, Shorts thumbnail 1080×1920, Post image 1080×1080 |
| TikTok | Profile photo 200×200, Photo post or cover 1080×1920 |
| Profile photo 165×165, Profile cover 1920×1080, Standard Pin 1000×1500, Square Pin 1000×1000 | |
| Threads | Profile photo 320×320, Post portrait 1080×1350, Post square 1080×1080 |
| Bluesky | Avatar 1000×1000, Banner 3000×1000 |
| Mastodon | Avatar 400×400, Header 1500×500 |
| Snapchat | Story 1080×1920 |
| Etsy | Listing photo 2000×2000, Big banner 1600×400, Mini banner 1600×213, Shop icon 500×500 |
Your own collections
Make a list of sizes for a client, a site or a brand.
- New creates a collection. Add sizes with a name, width and height.
- Manage lets you rename, edit or remove sizes, or delete the collection. Built-in collections can be duplicated to edit.
- Link copies a shareable link to the collection, and JSON copies it as JSON.
- Import takes a link or JSON from someone else.
To turn the crop into a favicon, iPhone and Android icons, a Mac .icns and a Windows .ico, see Make a favicon and app icons.
See every size at once (Frames)
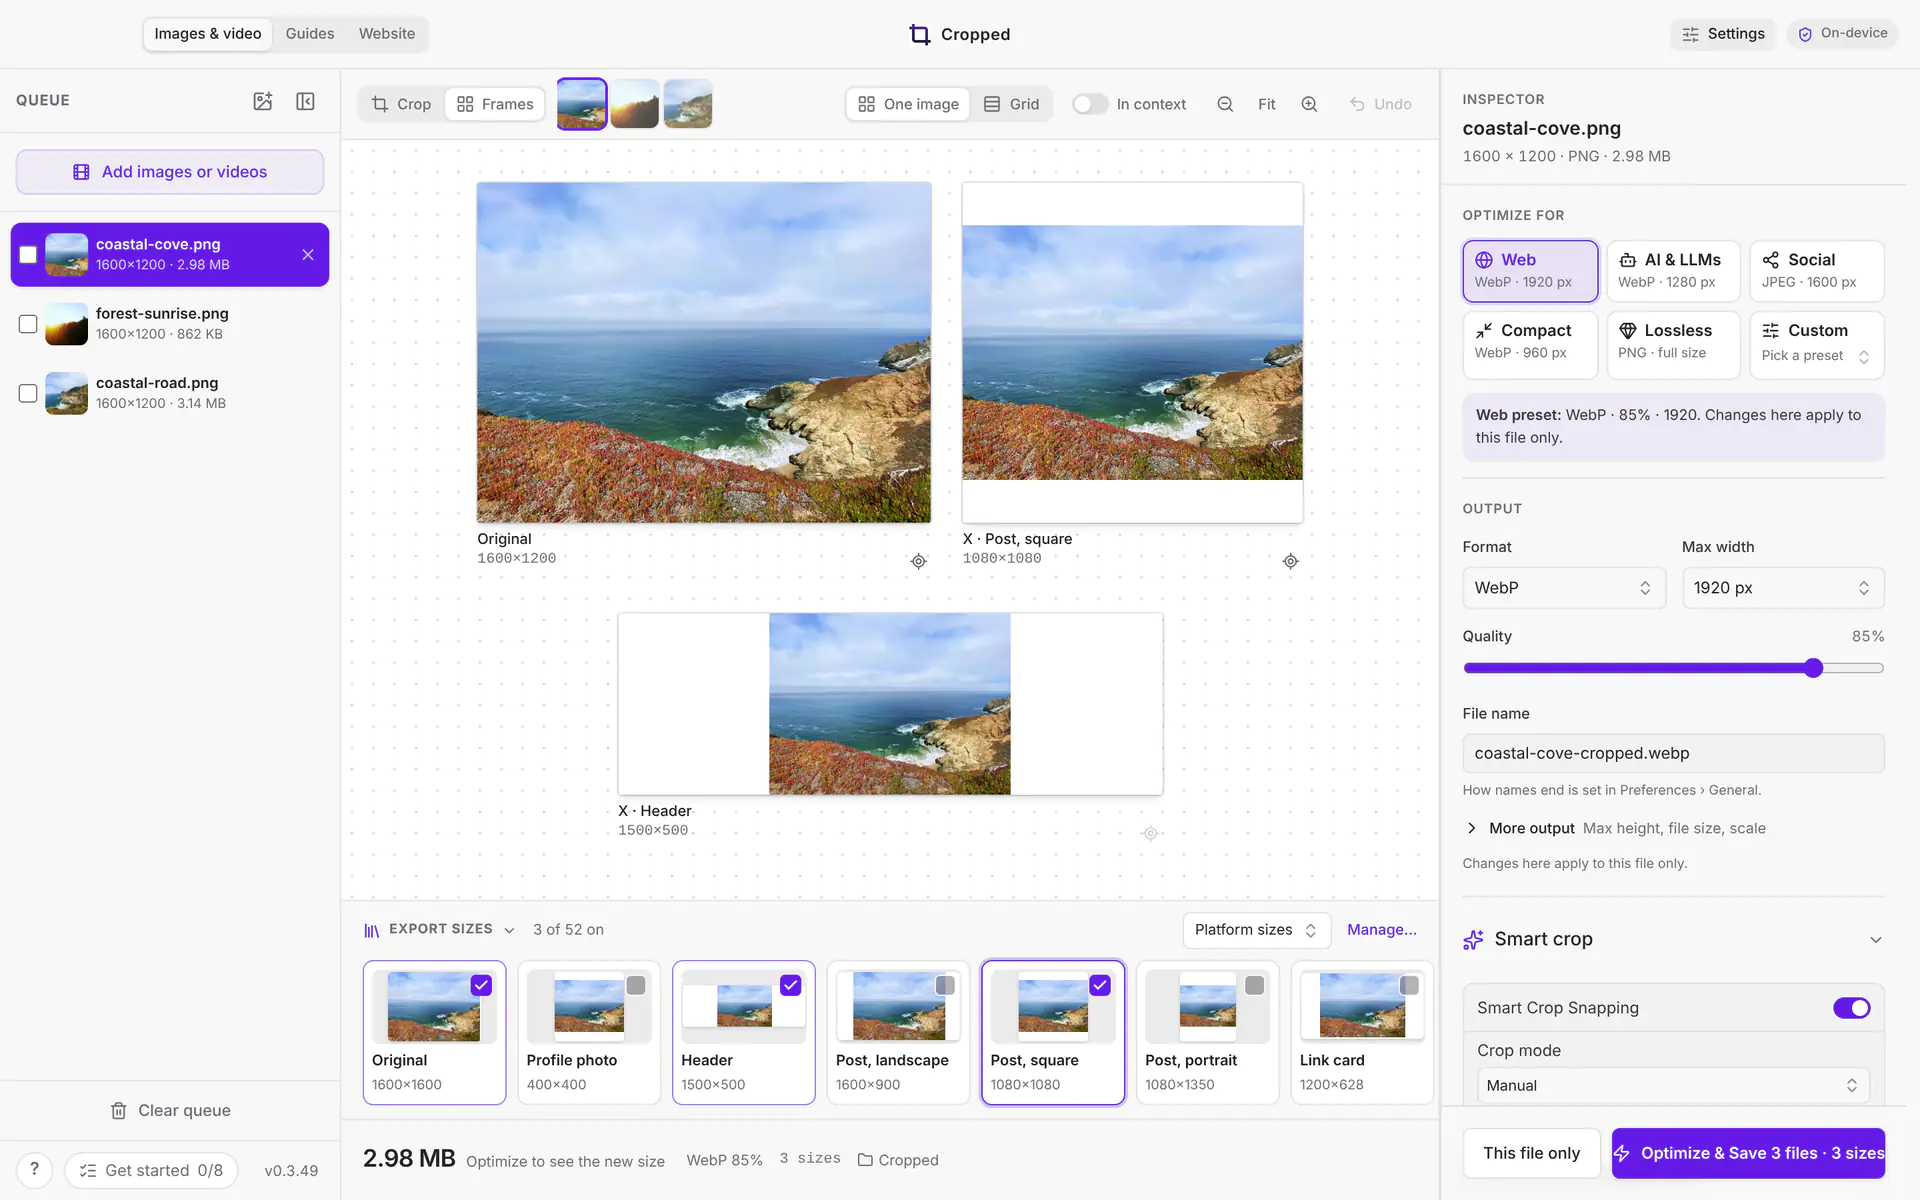
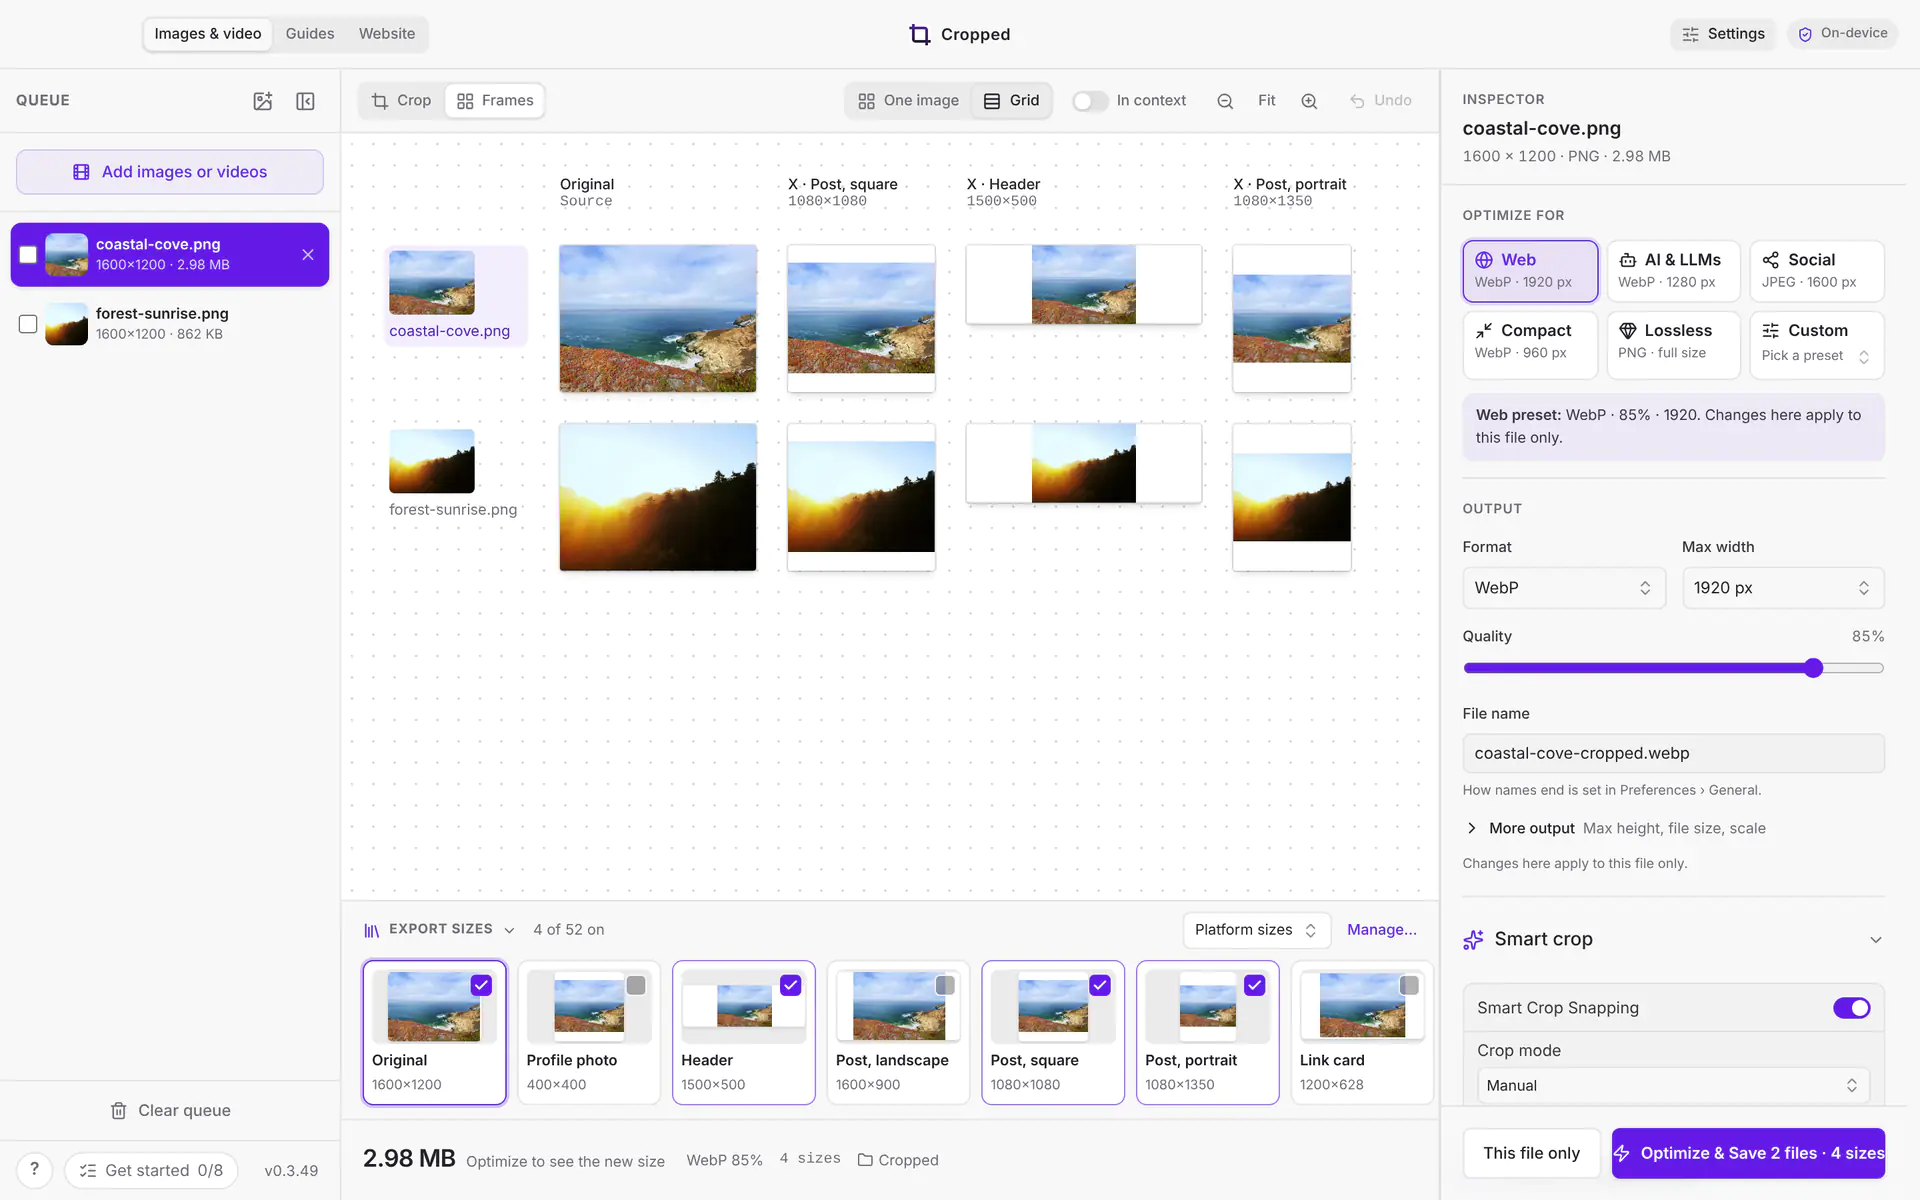
With two or more sizes ticked under Export sizes, click Frames at the top right of the image (next to Crop). Every size appears side by side as a live crop of the same image, with its name and pixel size. Each frame shows exactly what that size will export.
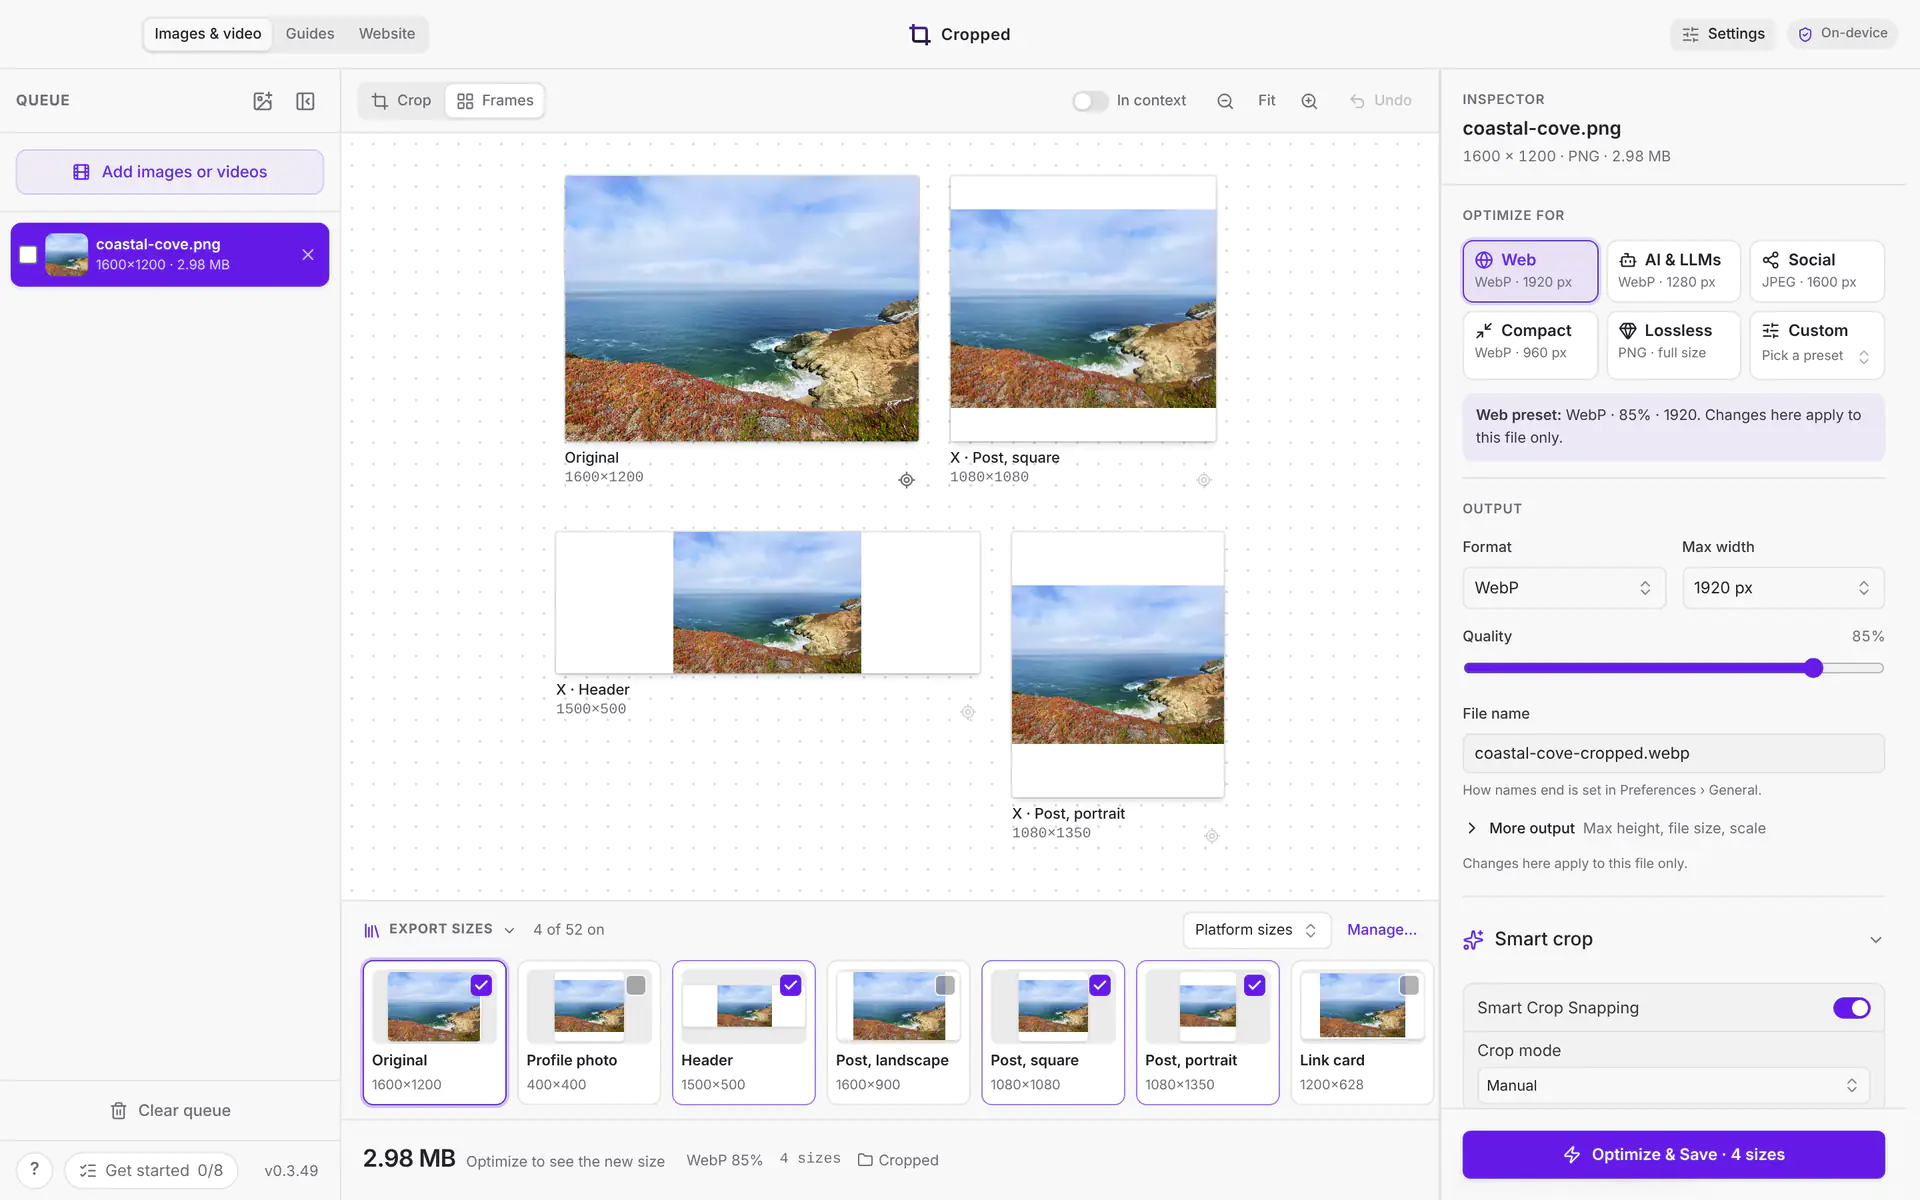
- Drag inside a frame to move the photo for that size only. The other sizes stay as they are.
- Drag a frame's corner to show more or less of the photo. The size keeps its shape.
- Click a frame, then use the arrow keys to move the photo 1 pixel, or 10 pixels with Shift.
- Click the target button under a frame to Re-center it: back to the centered framing, or to the subject with smart crop.
- A size shown in amber with a warning sign has a crop smaller than the size. Cropped never enlarges, so that file comes out smaller. Point at the size to see the exact numbers.
- Undo steps back the last change, and Fit, zoom out and zoom in change how big the frames are.
- Click Crop to go back to the single crop box. It shows the size you changed last.
Sizes you never touched show the framing Cropped would use on export: centered, or around the subject with smart crop.
It works the same on Windows and Linux: see the pictures on Windows and on Linux.
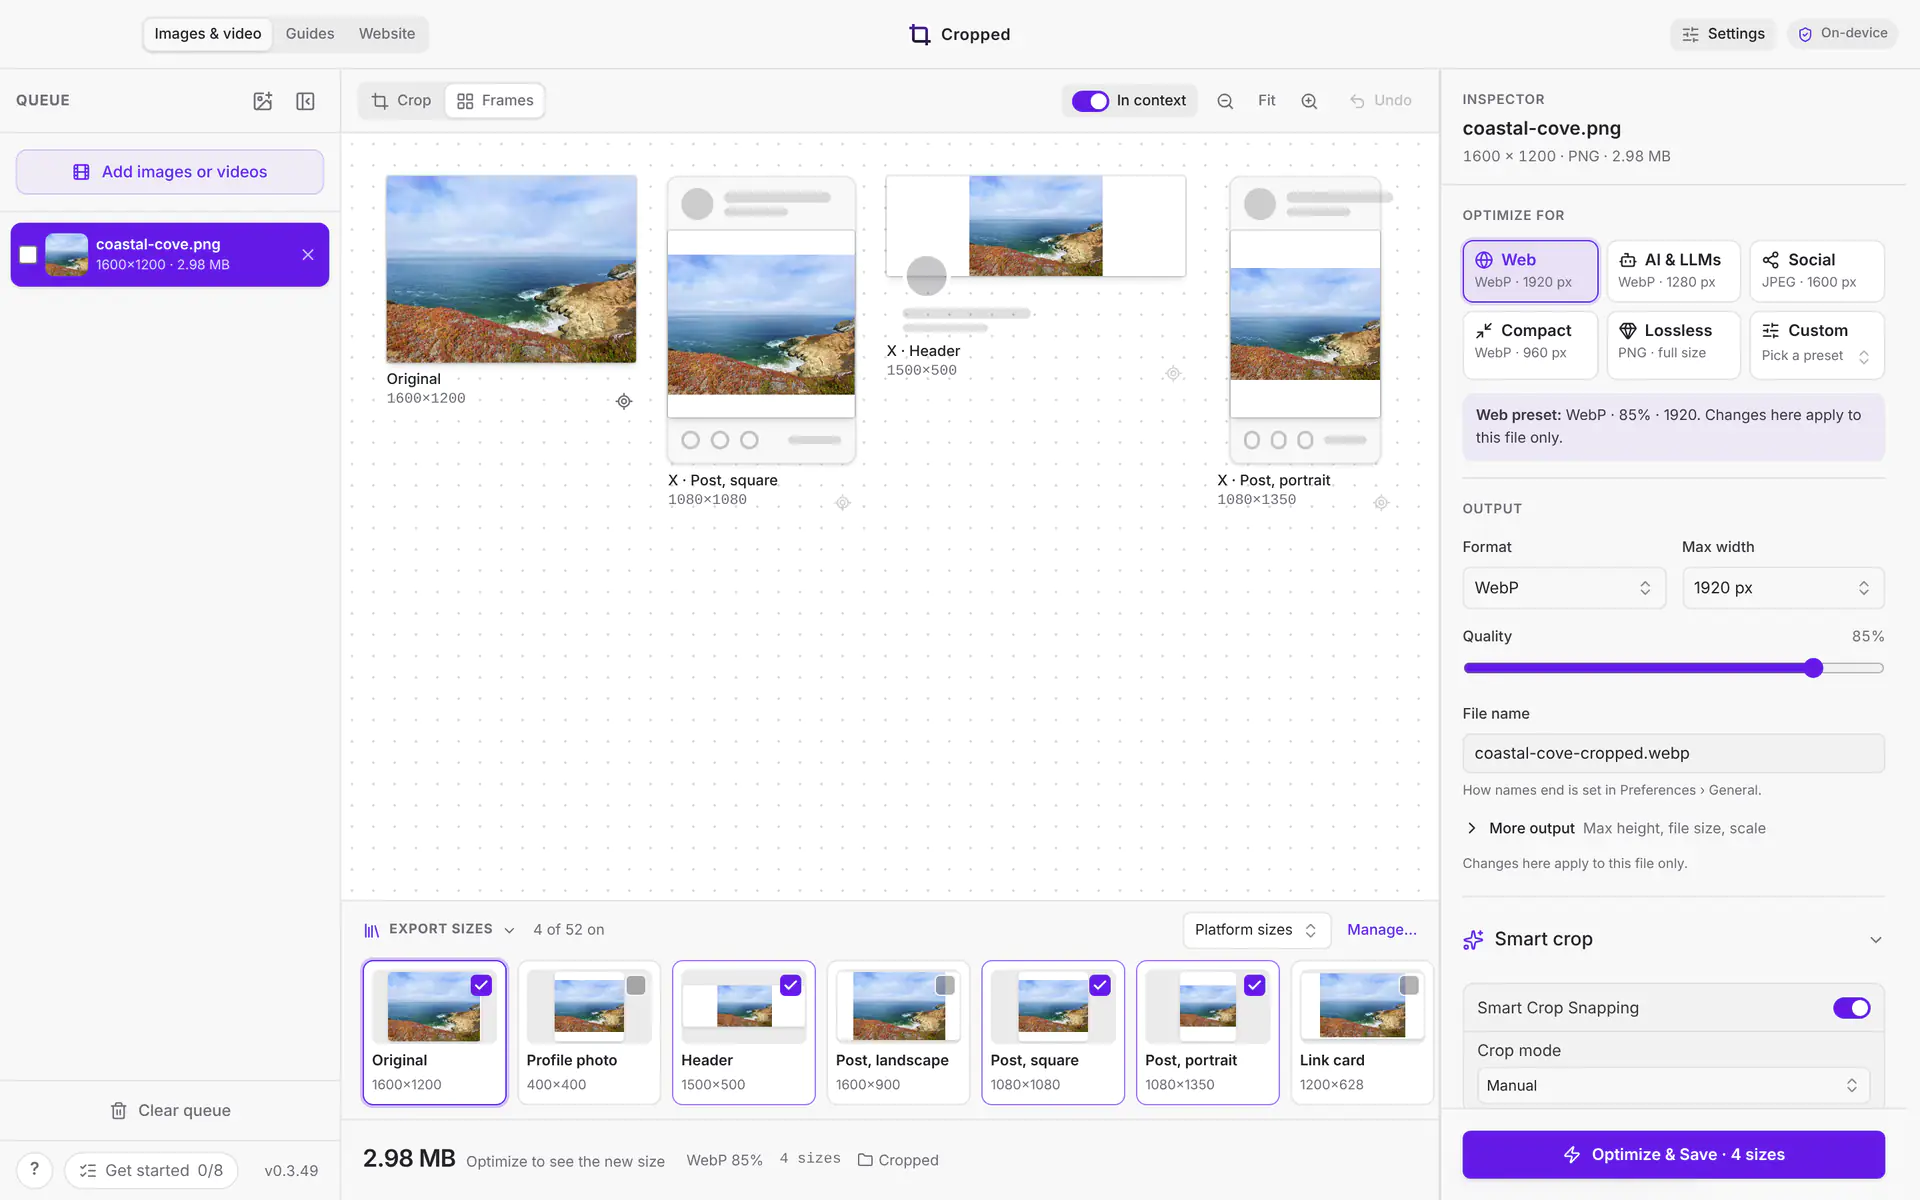
In context
Turn on In context to see each size inside a simple mock of where it appears: a feed post with a name above and buttons below, a Story or Reel with dashed lines where the app's own buttons cover the picture, a profile header with the round profile photo over its corner, a video thumbnail with its length, and round profile pictures. These are guides on screen only. They are never saved into your files. Sizes from your own collections show a plain frame.
Several images (Grid)
With more than one image in the Studio, the thumbnails at the top of Frames switch which image you see. Click Grid to see them all at once: one row per image and one column per size. Drag inside any cell to frame that image at that size.
Still stuck? Click the ? button at the bottom left of the Cropped Studio to ask, send us a message, or request a feature.